Setting up Edison/Explorer Board on a Mac - Alpha Instructions
(This is testing a separate workflow for Mac only. Please refer to the main Edison setup guide as well for troubleshooting & full instructions for other computer setup processes.)
Hardware Assumptions for this page
- Using an explorer board and Edison
- Using an Apple computer
- Using a Loop-compatible Medtronic pump (note - OpenAPS can actually use an additional set of pumps, the x12 series, although it requires one small extra step. See this page in OpenAPS docs for all compatible pumps.)
High Level Recommended Rig parts list
- Explorer Board - link
- Edison - link
- Nuts and Bolts - link
- At least one Lithium Battery (The larger battery will have a little longer battery life; but may be slightly bigger.)
- 2500mAh battery - link
- 2000mAh battery - link
- Cables (you may already have workable USB cables; you just need 2 to complete this process. Doesn’t have to be a certain length either, just giving options if you have a preference for shorter or longer cables.)
- 3 ft long cable, USB-microB - link
- 6 inch long cable, USB-microB - link
Getting Physical: Build your rig/put the physical pieces together
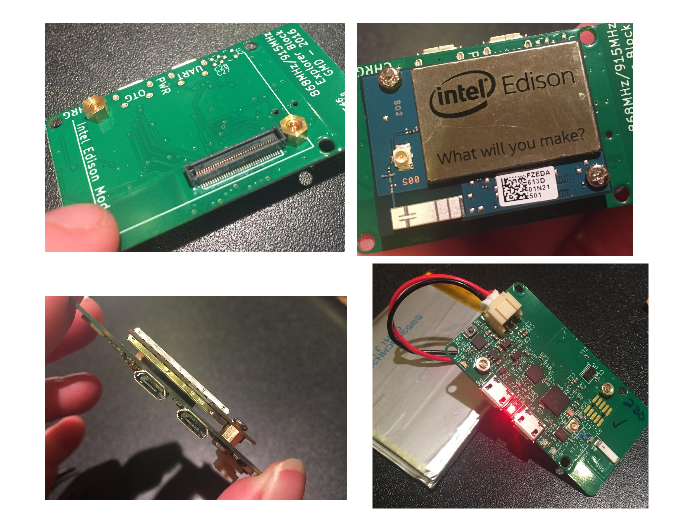
The Explorer board is where all the communications are housed for the rig, as well as the battery charger. The Edison is the mini-computer where all the OpenAPS code will be sent and used. In order for this to work, first you have to screw and connect the Edison and Explorer Board together with the nuts and bolts you order.
The nuts and bolts are tiny, and the spaces are a little tight. I find it really helps to use a set of tweezers and a small Phillips head screwdriver.
It’s easiest to start with the Explorer board and put on 2 nuts and gold screws (nuts on the side with most of the wiring) inside the little outline where the Edison will eventually sit. Gold screws should be placed as shown, with nuts on the backside. Then, lay the Edison board on top, aligning the screw holes. Use a small Phillips head screwdriver to tighten the screws into the gold screws beneath them. The Edison board should not wobble, and should feel secure when you are done. Attach your battery into the explorer board plug. A single red light should appear and stay lit. During the course of your OpenAPS rig use, it’s good practice to periodically check that the nuts and screws stay tightened. If they come loose, the Edison can wobble off the connection to the Explorer board and you will either get looping failures (if it’s loose) or be unable to connect to the Edison (if it comes completely off).
Software-build your rig
Building the software into your rig is comprised of three steps:
- Preparing the Edison (aka flashing the Edison)
- Installing the “looping” code (aka setup script for oref0)
- Customizing your loop
1. Preparing/flashing the Edison
The Edison comes with an operating system that doesn’t work easily with OpenAPS. The first step is to replace the operating system with a new one. This is called “flashing” the Edison.
Let’s start by downloading the updated operating system (it’s called Jubilinux) to your computer so that we can install it later onto the Edison. Go to Safari and download jubilinux.zip
Now we move to the Edison. You’ll see two microB USB ports on your explorer board. One is labeled OTG (that’s for flashing) and one is labeled UART (that’s for logging into the Edison from a computer). We will need to use both to flash. We’re going to plug both of those into our computer’s USB ports using the cables listed in the parts list (Dexcom’s charging cable will work too).

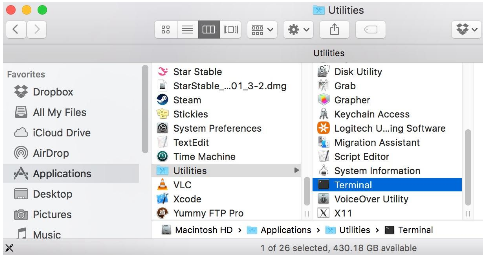
Once you plug in the cables, you should see your Edison board in your Finder as a connected “device” (similar to what you would see if you plug in a USB thumb drive). If you don’t…try different cables. If your USB port is bad and not recognizing the device, you may need to reset your SMC first (it’s not hard to do, takes 2 minutes.)
The OpenAPS uses Terminal, kind of like Loop uses Xcode. It’s our interaction with the code that forms the basis of the loop. You may have never even used the Terminal app. Go to your Applications folder and find the Terminal App in the Utilities folder. Double click to open it.
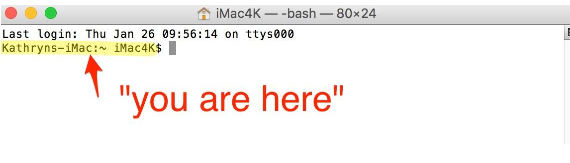
Terminal app is an ugly, plain interface…but it does what we need to do, communicate with the Edison. Basically, the Edison is a computer that lacks a keyboard and display. By using a cable connected to the rig, we can login to the Edison and use Terminal as a way of interacting with the Edison.
When you first launch Terminal, you will probably see something rather plain like below. The important thing to know is that the Terminal helps show you WHERE you are in your computer or Edison. So, in the screenshot below, it’s telling me I am in my “iMac4K” user account. If you are ever a little confused where you are…you can look to the left of the $ prompt and get an idea.
If you’re like me, you don’t “speak linux” (or python or java or…) nor do you really know what linux is. So, you’ll be comforted to know that most of this setup is copy and paste commands into Terminal. You won’t need to suddenly learn linux…just will need to follow directions and be willing learn some basics.
IMPORTANT NOTE: STEPS 1-10 will be updated periodically, and also will likely be out of date. Since this is just a cheat sheet for Mac users, it may not have all the troubleshooting tips or updated info that the main OpenAPS docs have. If you get stuck and this guide’s set of instructions do not work at the moment, the place to look is the OpenAPS Walkthrough Phase 0, Setting up your Intel Edison for the full information on this part of the OpenAPS setup.
The next steps will be done in the Terminal app. If you see red colored text/code lines in a box, that’s what you want to copy and paste into Terminal, and then press enter. Don’t try typing it…you’ll likely miss a space or add a typo. So, let’s start…
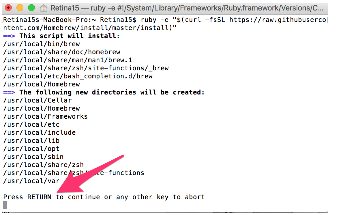
1-1. Install homebrew
ruby -e "$(curl -fsSL https://raw.githubusercontent.com/Homebrew/install/master/install)"
You will be prompted to enter “RETURN” to continue and then enter your passcode for the user account (your computer password). When you type the password, you will not see any letters appear in the Terminal screen..that is normal. Terminal does not show keystrokes for passwords.
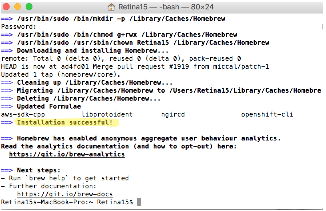
It will take about 1-2 minutes for Homebrew to install. You’ll see a bunch of commands scrolling by in Terminal window. Just wait it out until you see the screen showing Installation successful and you’ll be returned to the $ Terminal prompt.
1-2. Install a bunch of other stuff (dfu-util, coreutils, gnu-getopt)
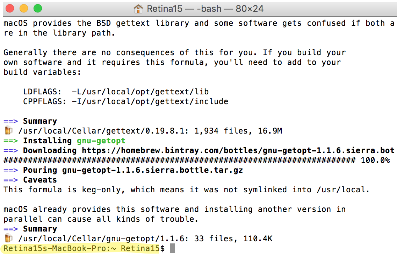
brew install dfu-util coreutils gnu-getopt
1-4. Start Edison in screen mode
sudo screen /dev/tty.usbserial-* 115200
You’ll most likely be asked for your computer password again. Enter it. A blank screen will likely come up, then press enter to wake things up to show an Edison login prompt. Login with username “root” (no quotes) and no password will be needed. Leave this window alone for a bit as we proceed with next steps.
If you have a problem getting to the Edison login prompt, and possibly get a warning like “can’t find a PTY”, close that terminal window. Then unplug the usb cables from your computer (not from the Edison...leave those ones as is) and swap the USB ports they were plugged in. Open a new terminal window, use the sudo screen /dev/tty.usbserial-* 115200 command again. Usually just changing the USB ports for the cables will fix that “can’t find a PTY” error.
1-5. Flash the Edison
- Open a new Terminal Window (leave the existing one from that last screenshot open…we need a second window) by selecting command-N or using menu bar Shell>New Window>New Window with Settings-Basic.
- In the new window, enter
cd ~/Downloads/jubilinuxThis will change your directory.
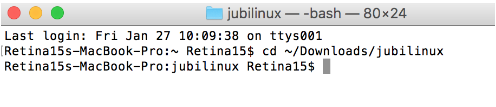
- Enter
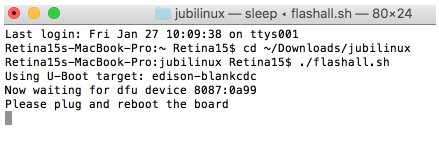
./flashall.sh - You’ll get a prompt that asks you to “plug and reboot” the Edison board. You’re done with this screen for now. Just leave it alone (don’t close window) and go to next step.
1-6. Return to the other Terminal Window that we left off of in Step 4.
- Enter
reboot
1-7. Now we wait and watch.
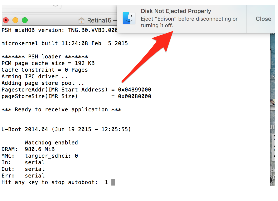
You may see a message notification that the Edison “Disk Not Ejected Properly”. Don’t worry...it is rebooting. You will see some processes going on in the background.
You should see:
Hit any key to stop autoboot:  0
Target:blank
Partitioning using GPT
Writing GPT: success!
Saving Environment to MMC...
Writing to redundant MMC(0)... done
Flashing already done...
GADGET DRIVER: usb_dnl_dfu
#
DFU complete CRC32: 0x77ccc805
DOWNLOAD ... OK
Ctrl+C to exit ...
######################################################################################################################
in the terminal window where you typed reboot, and
Using U-Boot target: edison-blankcdc
Now waiting for dfu device 8087:0a99
Please plug and reboot the board
Flashing IFWI
Download    [=========================] 100%      4194304 bytes
Download    [=========================] 100%      4194304 bytes
Flashing U-Boot
Download    [=========================] 100%       245760 bytes
Flashing U-Boot Environment
Download    [=========================] 100%        65536 bytes
Flashing U-Boot Environment Backup
Download    [=========================] 100%        65536 bytes
Rebooting to apply partition changes
Now waiting for dfu device 8087:0a99
Flashing boot partition (kernel)
Download    [=========================] 100%      5980160 bytes
Flashing rootfs, (it can take up to 10 minutes... Please be patient)
in the terminal window where you ran ./flashall.sh. As it says, this should take about 10 minutes. It may appear like nothing is happening for awhile, but wait it out. If it didn’t take long at all...chances are that the flash didn’t really work, in which case you should read through the [full docs] and try again, and/or check out the Troubleshooting section at the bottom.
OLDER JUBILINUX VERSIONS: After flashing is complete, watch the window as you should get asked to type control-D to continue. If so, go ahead and press (don’t type that out, just press the keys) control-D to keep going. After one of the reboots, you’ll probably see:
[** ] A start job is running for /etc/rc.local Compatibili...14s / no limit)
for a few minutes: that’s fine. You can also expect to see an ugly red:
[FAILED] Failed to start Hostname Service.
That is also fine, and you can ignore it too.
NEWER JUBLINUX VERSIONS (0.1.0 and later): You probably won’t get asked to Control-D and that is fine.
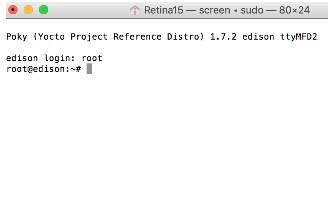
After several reboots (don’t panic), you should get a ubilinux login prompt (If you see Yocto instead of ubliniux, then you need to go back to Step 1-4 and start the flash process over again). Use login root and password edison.
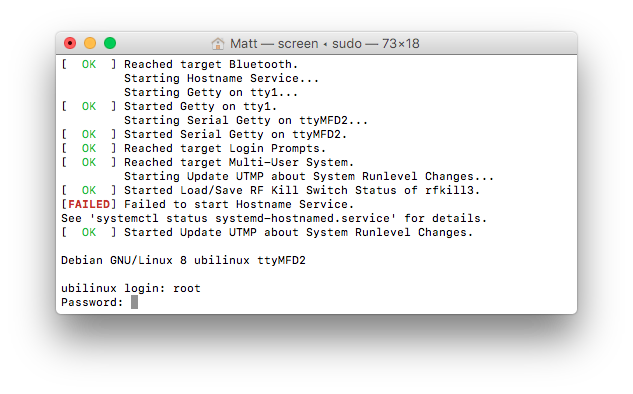
CONGRATULATIONS! You just flashed the edison! Wahoo! Now, let’s keep going.
1-8. Wifi for Edison
Now that you’ve finished flashing, the Edison is going to need a couple things to finish setting it up; Hostname/passwords and Multiple WiFi networks
Hostname and password
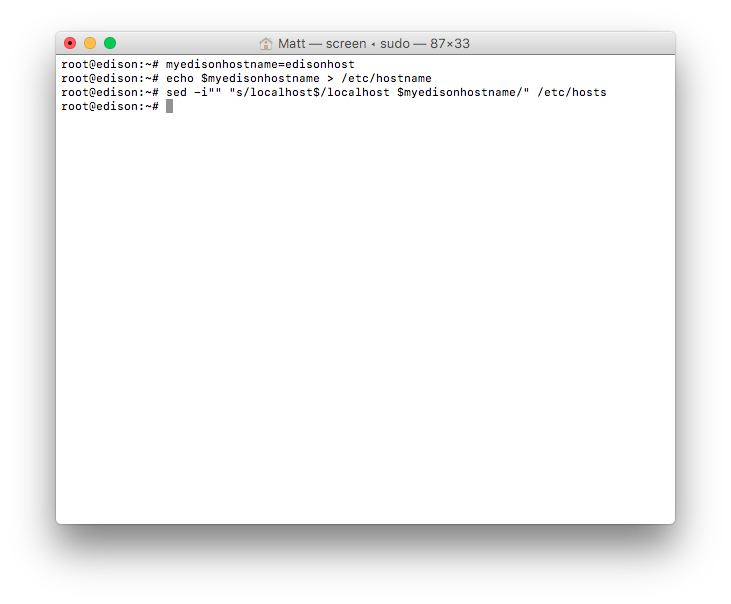
- From that same screen we just left off , enter these three commands in succession
myedisonhostname=<thehostname-you-want><—But replace the <> section with your chosen hostname. I used “edisonhost” as the name, as shown in screenshot below. Then paste in:
echo $myedisonhostname > /etc/hostname
sed -r -i"" "s/localhost( jubilinux)?$/localhost $myedisonhostname/" /etc/hosts
(without any modifications) and it will set your hostname in both places. (note: screenshot below is a little different than you will see on your screen. You will see root@ubilinux)
IMPORTANT
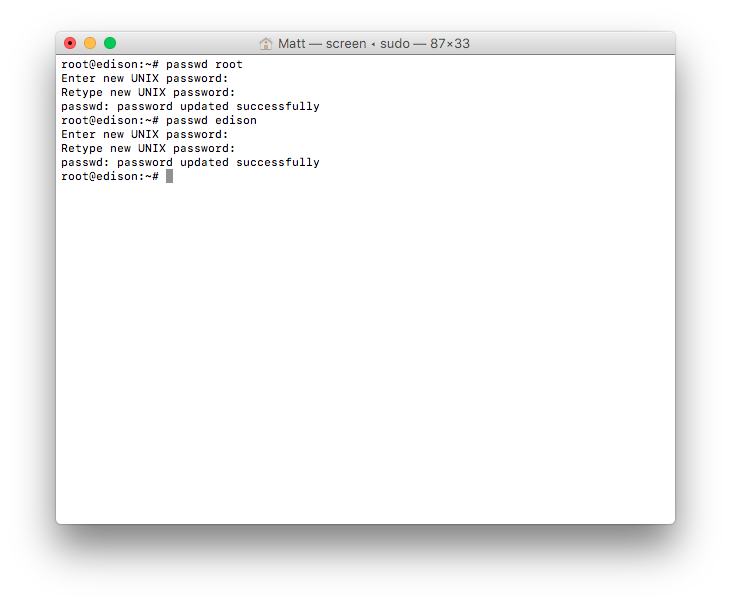
- To change the password for your Edison to a more secure password than “edison”, enter
passwd root - Follow the commands to reset the password. Repeat for
passwd edison - SAVE PASSWORDS somewhere, you’ll want them.
1-9. Multiple wifi networks
A-1. Enter
vi /etc/network/interfaces
A-2. A screen similar to the one below will appear. Type “i” to enter INSERT mode for editing on the file.
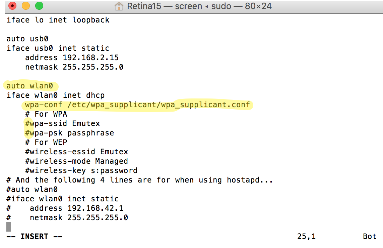
HELPFUL TIP: If you are new to insert mode, realize that it inserts characters at the highlighted cursor (it does not overwrite the character showing beneath the cursor). And, the default is that the cursor will be at the top left of the screen to start, so you will need to use the arrow keys to move the cursor to the area where you want to start typing. If you freak out that you’ve made a change that you don’t want to commit...you can simply press the ESC key and then type (no quotes) “:q!” to quit without saving any of your typing/changes.
A-3. Make the changes so they match the areas highlighted in yellow, above:
- uncomment (remove the #) from the auto wlan0 line
- add
wpa-conf /etc/wpa_supplicant/wpa_supplicant.confright below the iface wlan0 line. - comment out (add #) to the wpa-ssid and wpa-psk lines as shown
A-4. Press ESC then type “:wq” (no quotes) and enter to write (save) and quit that screen. When you press ESC, you won’t initially see much different, but when you type ”:wq”, you will see the characters appear in the lower left of the screen.
B-1. Enter vi /etc/wpa_supplicant/wpa_supplicant.conf
B-2. Type “i” to enter INSERT mode for editing on the file.
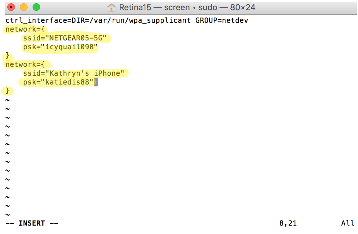
B-3. Add the following for each wifi network you’d like to add.
network={
    ssid="my network"
    psk="my wifi password"
}
These are the wifi networks that your rig will be able to use to stay connected to internet. Examples shown in yellow. One is my home wifi, the other is my iphone’s personal hotspot.
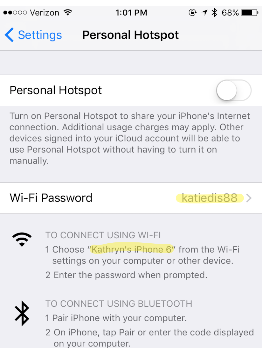
- Note: If you don’t know your personal hotspot’s information, you can find it under your iPhone Settings>Personal Hotspot
- You will definitely want to add it to the list of wifi networks.
B-4. Press ESC then type “:wq” to write (save) and quit that screen when you have finished adding the wifi networks. You can always come back and add more networks as needed, using the same process.
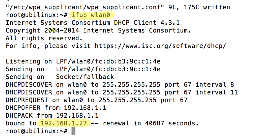
C Run ifup wlan0 to make sure you can connect to wifi. A successful connection should look similar (IP address numbers will be different than mine):
If you don’t see a message showing you are successfully connected, go back to the start of Step 1-9 and make sure that you don’t have any typos in those two files.
1-10. Installing packages, SSH keys, and other settings
ALRIGHTY...Your Edison is coming along. Now we are going to set aside the Edison “screen” terminal window (in case we can’t get in via ssh), reboot, and login using an “ssh” command from a new Terminal window.
- Type
reboot - Wait as many lines of action go by in the Terminal window...eventually you will get to a prompt that has your new edisonhost name login. We aren’t going to login right now. Just saving that window in case we need it later.
- Open a new Terminal window by pressing Command-N
- Login to your Edison by entering
ssh root@edisonhost.local(changing edisonhost to the hostname you selected earlier above) - Enter your password that you set earlier
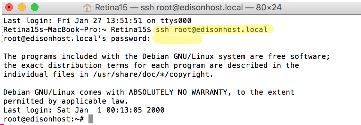
- Run
ping google.comto make sure your rig is online. If your rig shows up as online successfully, you can enter control-c to exit the ping. If the rig isn’t online, go back and check your /etc/network/interfaces and /etc/wpa_supplicant/wpa_supplicant.conf files above: you probably either missed a step or made a typo. - Enter these three lines, one-at-a-time (the first line will run fast, and the second and third lines may take several minutes to complete)
dpkg -P nodejs nodejs-dev
apt-get update && apt-get -y dist-upgrade && apt-get -y autoremove
apt-get install -y sudo strace tcpdump screen acpid vim python-pip locate
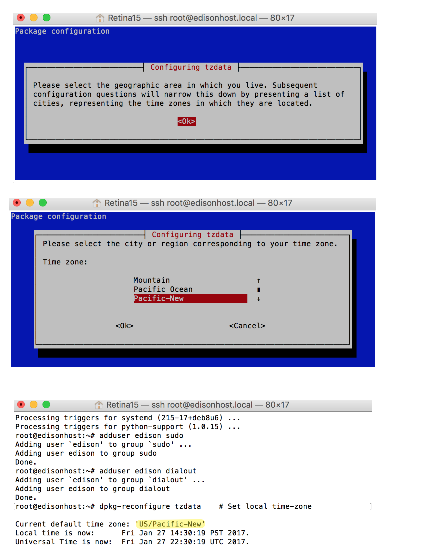
- Enter these three lines, one-at-a-time (the first two will be fast, the last line will take you to a screen for setting up your timezone. Screenshots are just for examples...in this case PST
adduser edison sudo
adduser edison dialout
dpkg-reconfigure tzdata # Set local time-zone
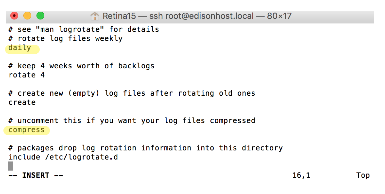
- Enter
vi /etc/logrotate.confthen press “i” for INSERT mode, and make the following changes: - set the log rotation to daily from weekly
- remove the # from the “#compress” line
- Press ESC and then type “:wq” to save and quit
Congratulations you have successfully flashed your edison and configured some basic settings. Time to move onto OpenAPS install
2. Installing the looping script (openaps-setup.sh)
You’ll now want to move on to the Phase 1 instructions if you haven’t already set up Nightscout; and if you’ve already done that, onward to Phase 2 to install the closed loop!
3. Personalising your closed loop
See the phase 3 documentation for personalizing your closed loop.