Visualization and Monitoring
Nightscout Introduction
Nightscout is an open source, DIY project that allows real-time access to a CGM data via personal website, smartwatch viewers, or apps and widgets available for smartphones. Setting up a Nightscout web app is the recommended way to visualize your OpenAPS closed loop.
Nightscout allows a user to upload CGM data from a variety of sources, to an online database and cloud computing service. The information is then processed and displayed visually as a graph. There are plugins that allow greater information to be shown about OpenAPS, too. As the data is uploaded to an online website and then retrieved by OpenAPS, it allows OpenAPS a wider range of compatibility with various CGM solutions.
Nightscout is the recommended way to visualize your OpenAPS closed loop.
Even if you don’t choose to share your Nightscout site with another person, it will be helpful for you to visualize what the loop is doing; what it’s been doing; plus generate helpful reports for understanding your data, customized watchfaces with your OpenAPS data, and integration with IFTTT. You can read more about the latest Nightscout features here.
Nightscout Setup
- If you plan to use Nightscout with OpenAPS, we recommend using Heroku, as OpenAPS can reach the usage limits of the free Azure plan and cause it to shut down for hours or days. If you end up needing a paid tier, the $7/mo Heroku plan is also much cheaper than the first paid tier of Azure. Currently, the only added benefit to choosing the $7/mo Heroku plan vs the free Heroku plan is a section showing site use metrics for performance (such as response time). This has limited benefit to the average OpenAPS user. In short, Heroku is the free and OpenAPS-friendly option for NS hosting.
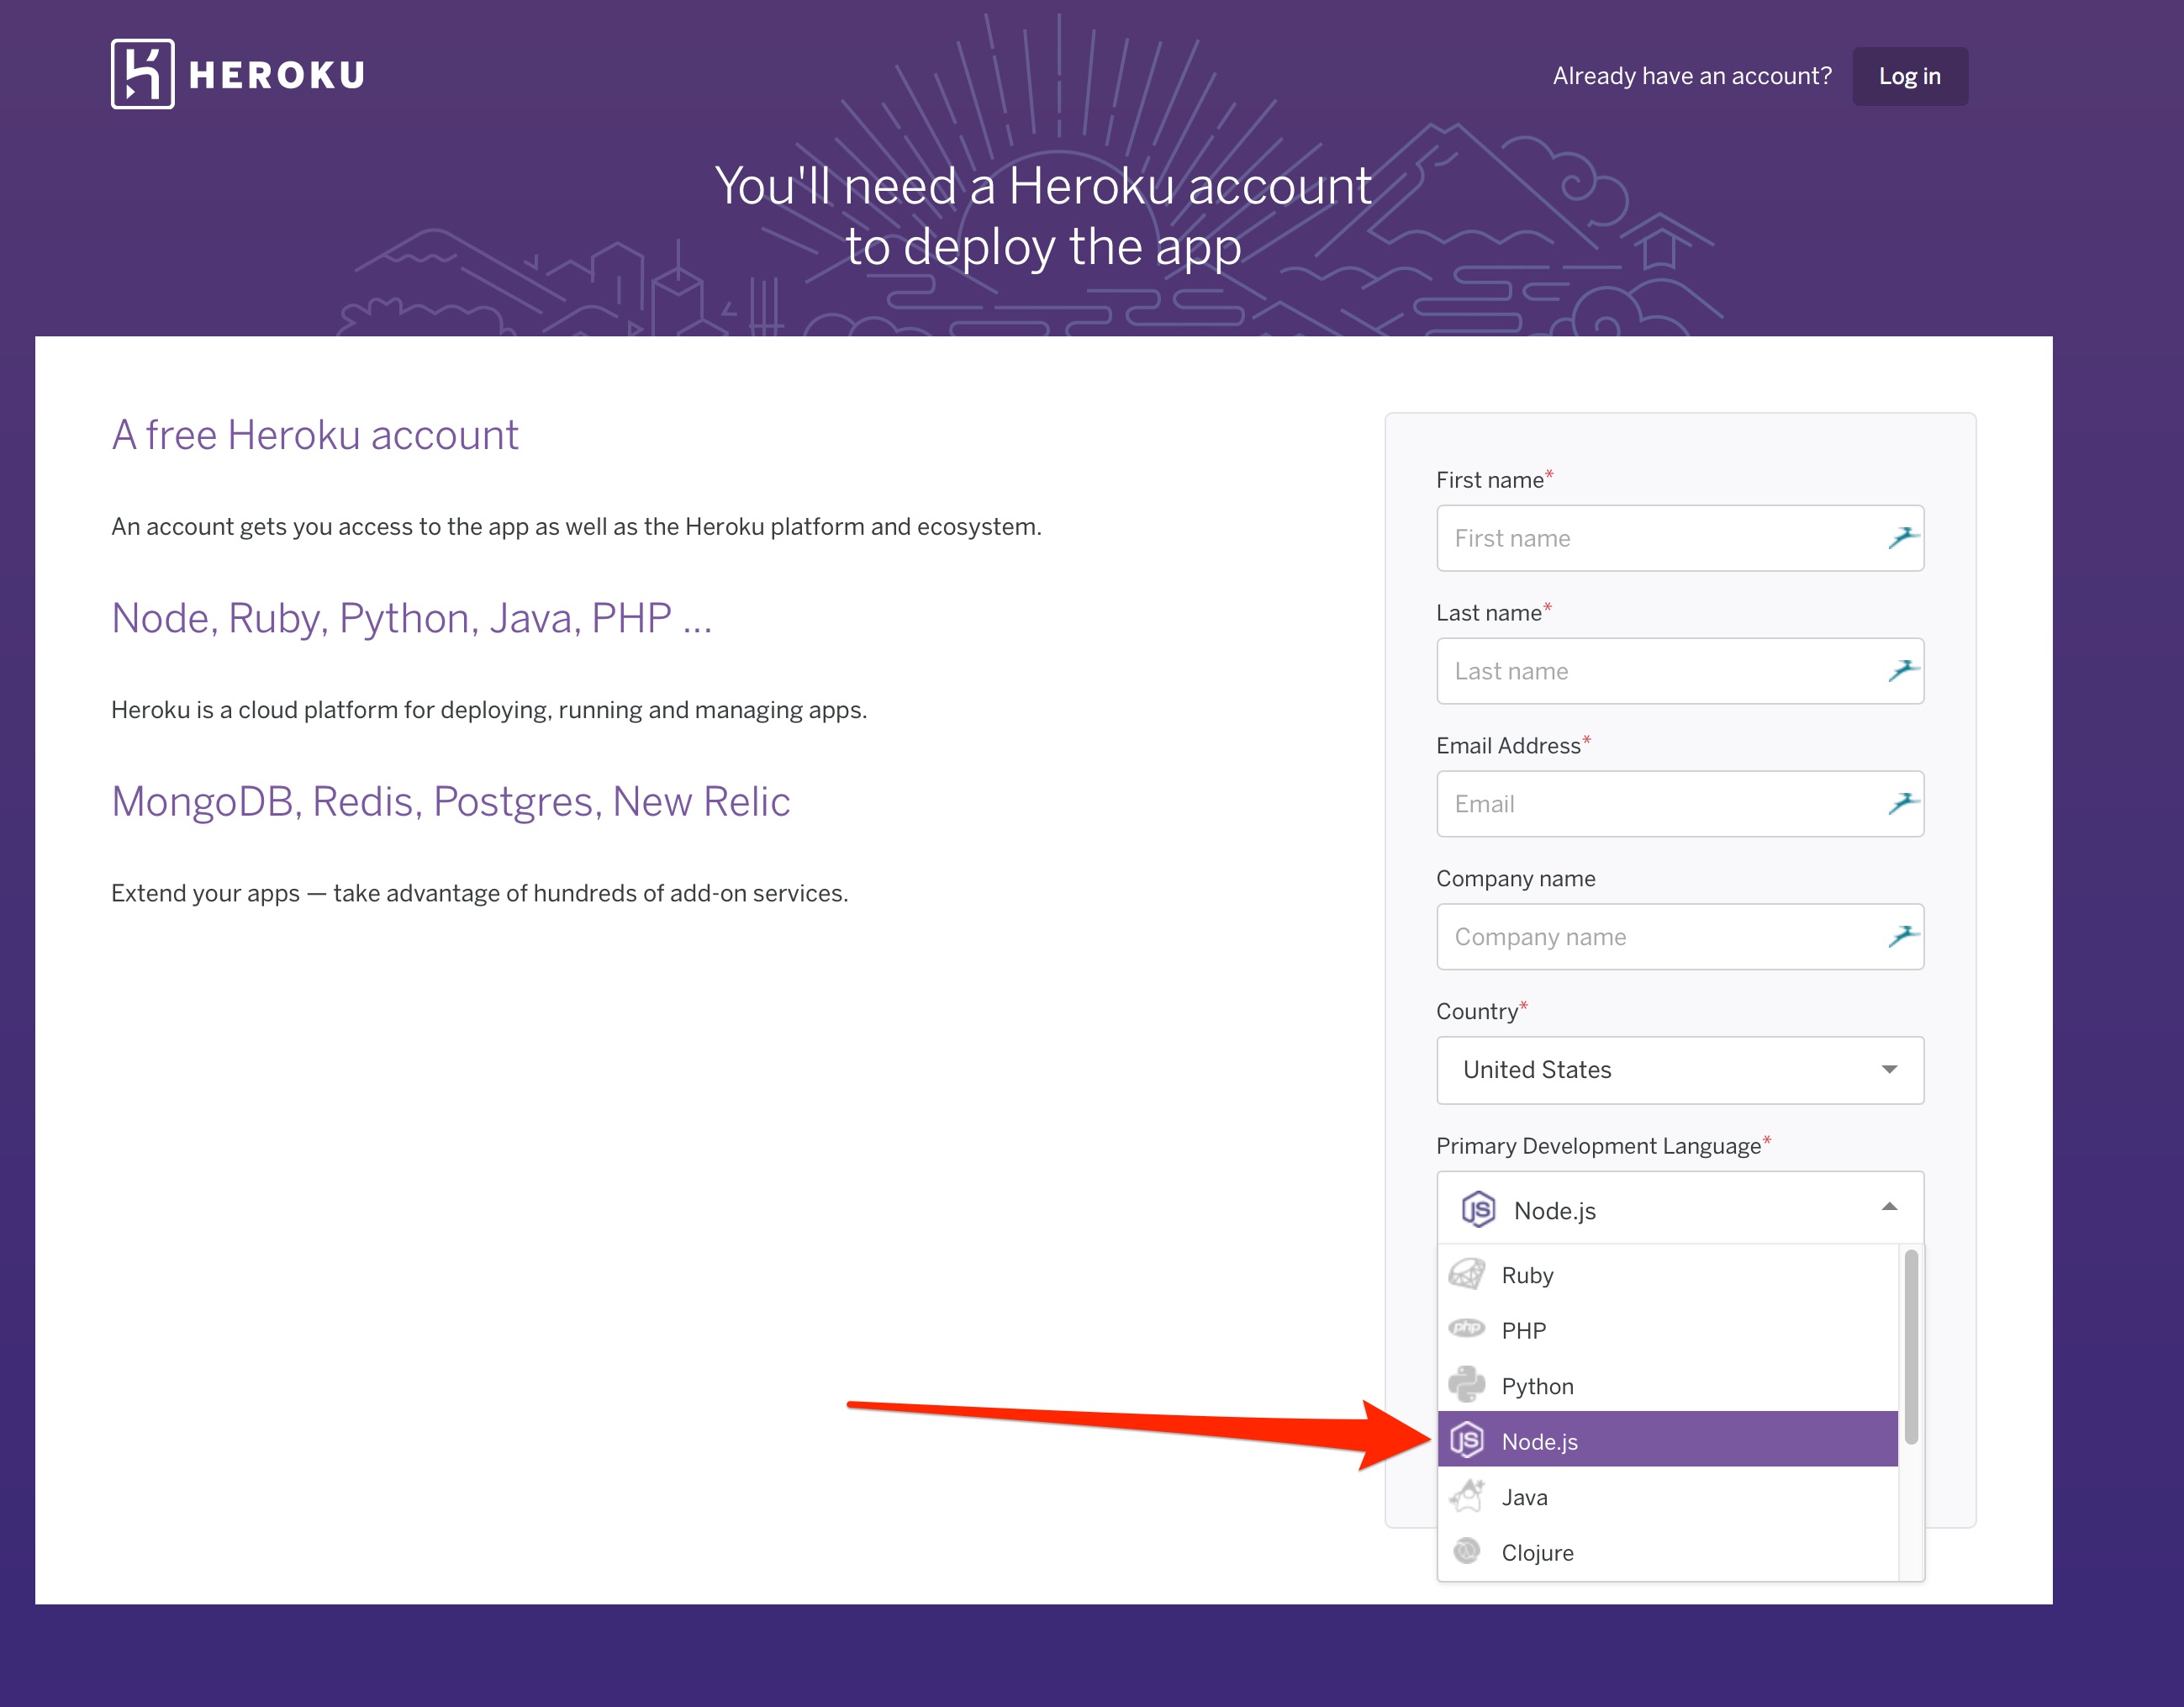
- Create an account at Heroku and choose the Primary Development Language to be Node.js when you create your account. You’re going to use a free account, but you will still need to enter credit card information for your account setup before the app will deploy. You’ll need confirm your Heroku account by clicking a link sent via email.
- Create an account at GitHub
Note: If you already have an existing GitHub account and NS site, you may just need to update your repository by doing a Compare in GitHub. Use https://github.com/yourgithubname/cgm-remote-monitor/compare/master...nightscout:master and replace yourgithub name. Click the big green Create pull request button. Another screen will appear, fill in a title and click button to create the pull request, and then you can Merge pull request, and finally Confirm merge. That process updates your Nightscout repository in Github. Once updated, you can skip the “click the Fork Button” step below and start following along with the purple Deploy to Heroku button step from your updated Nightscout cgm-remote-monitor repository.
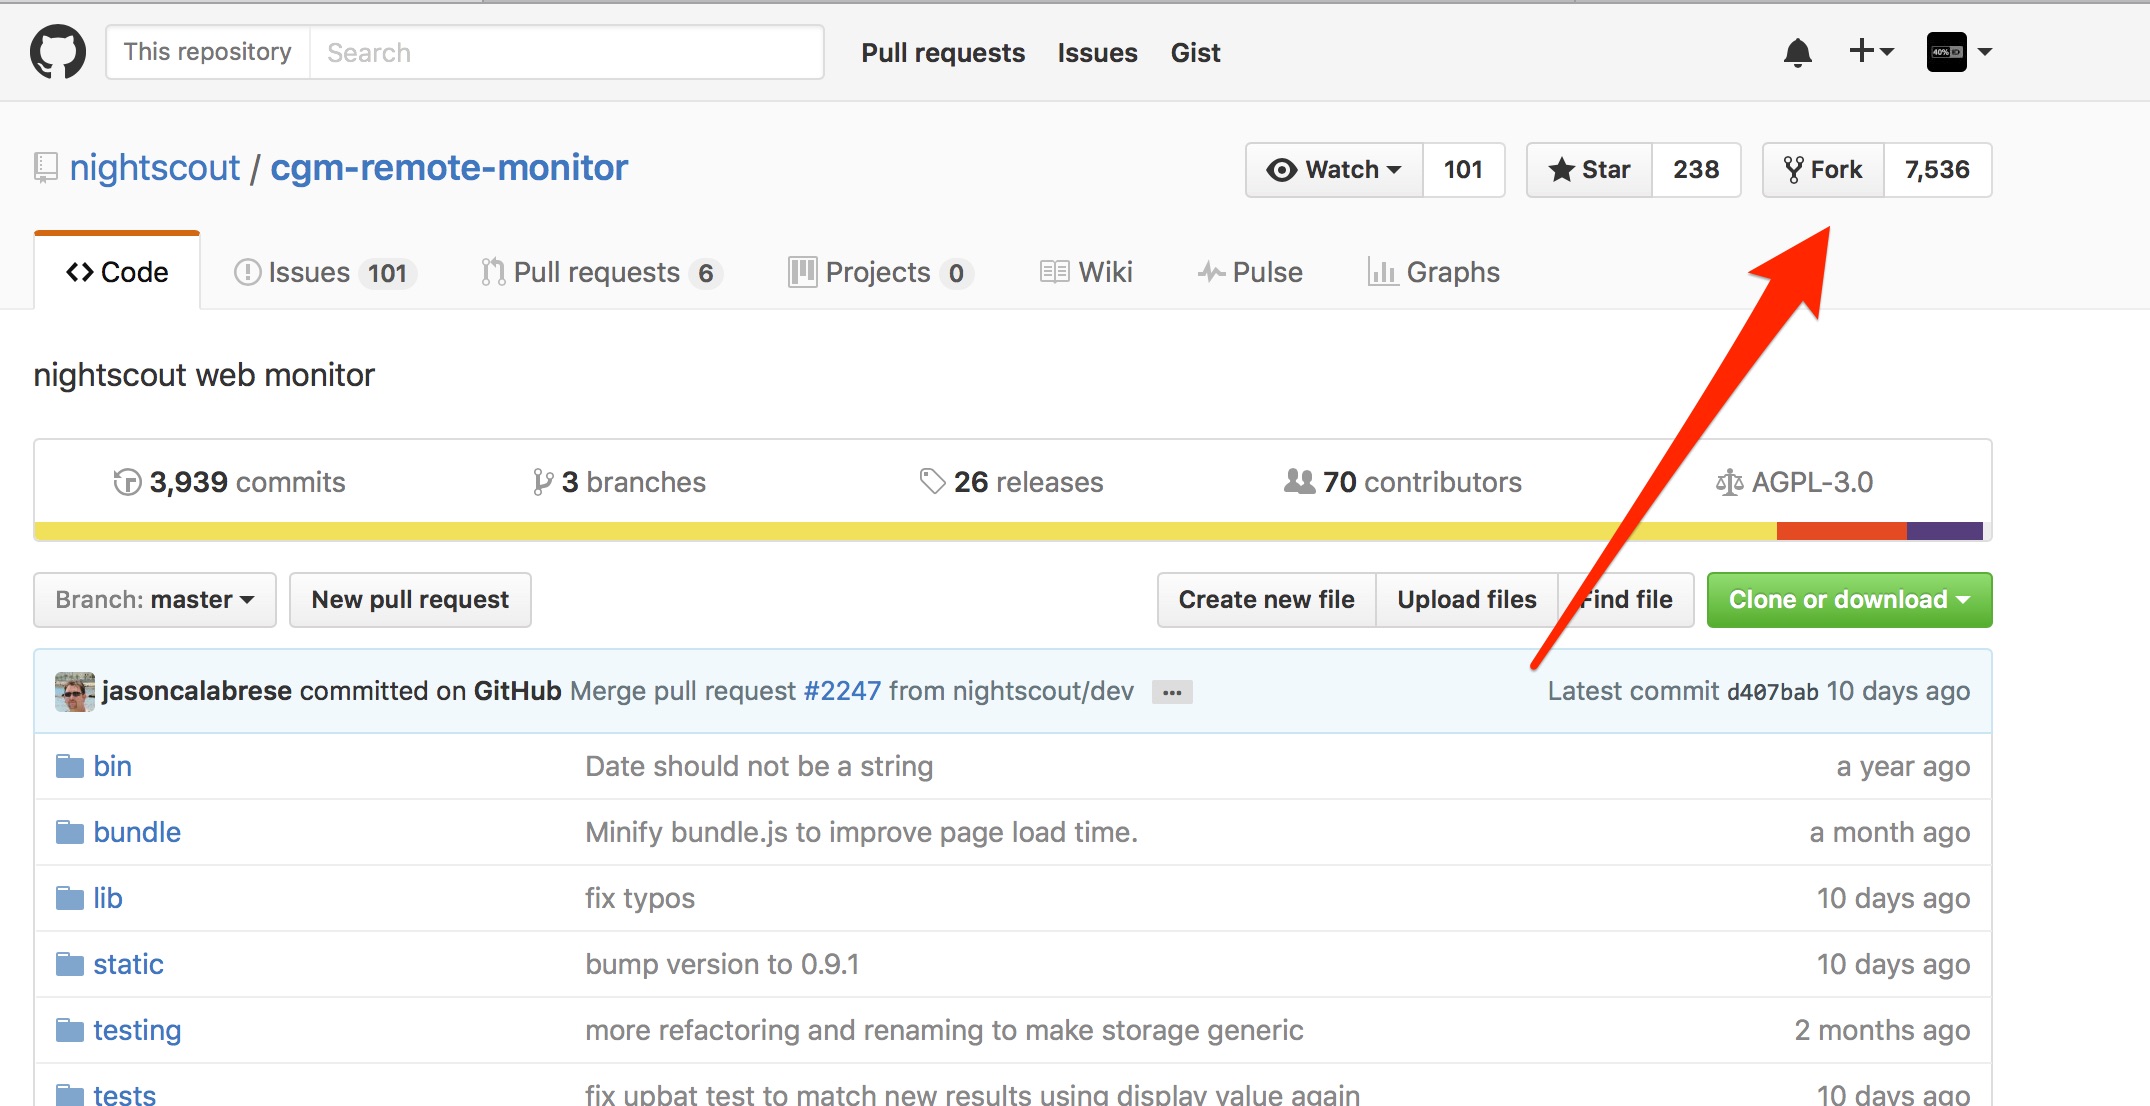
- Go to the Nightscout cgm-remote-monitor repository
- Click the
Forkbutton in the upper right corner
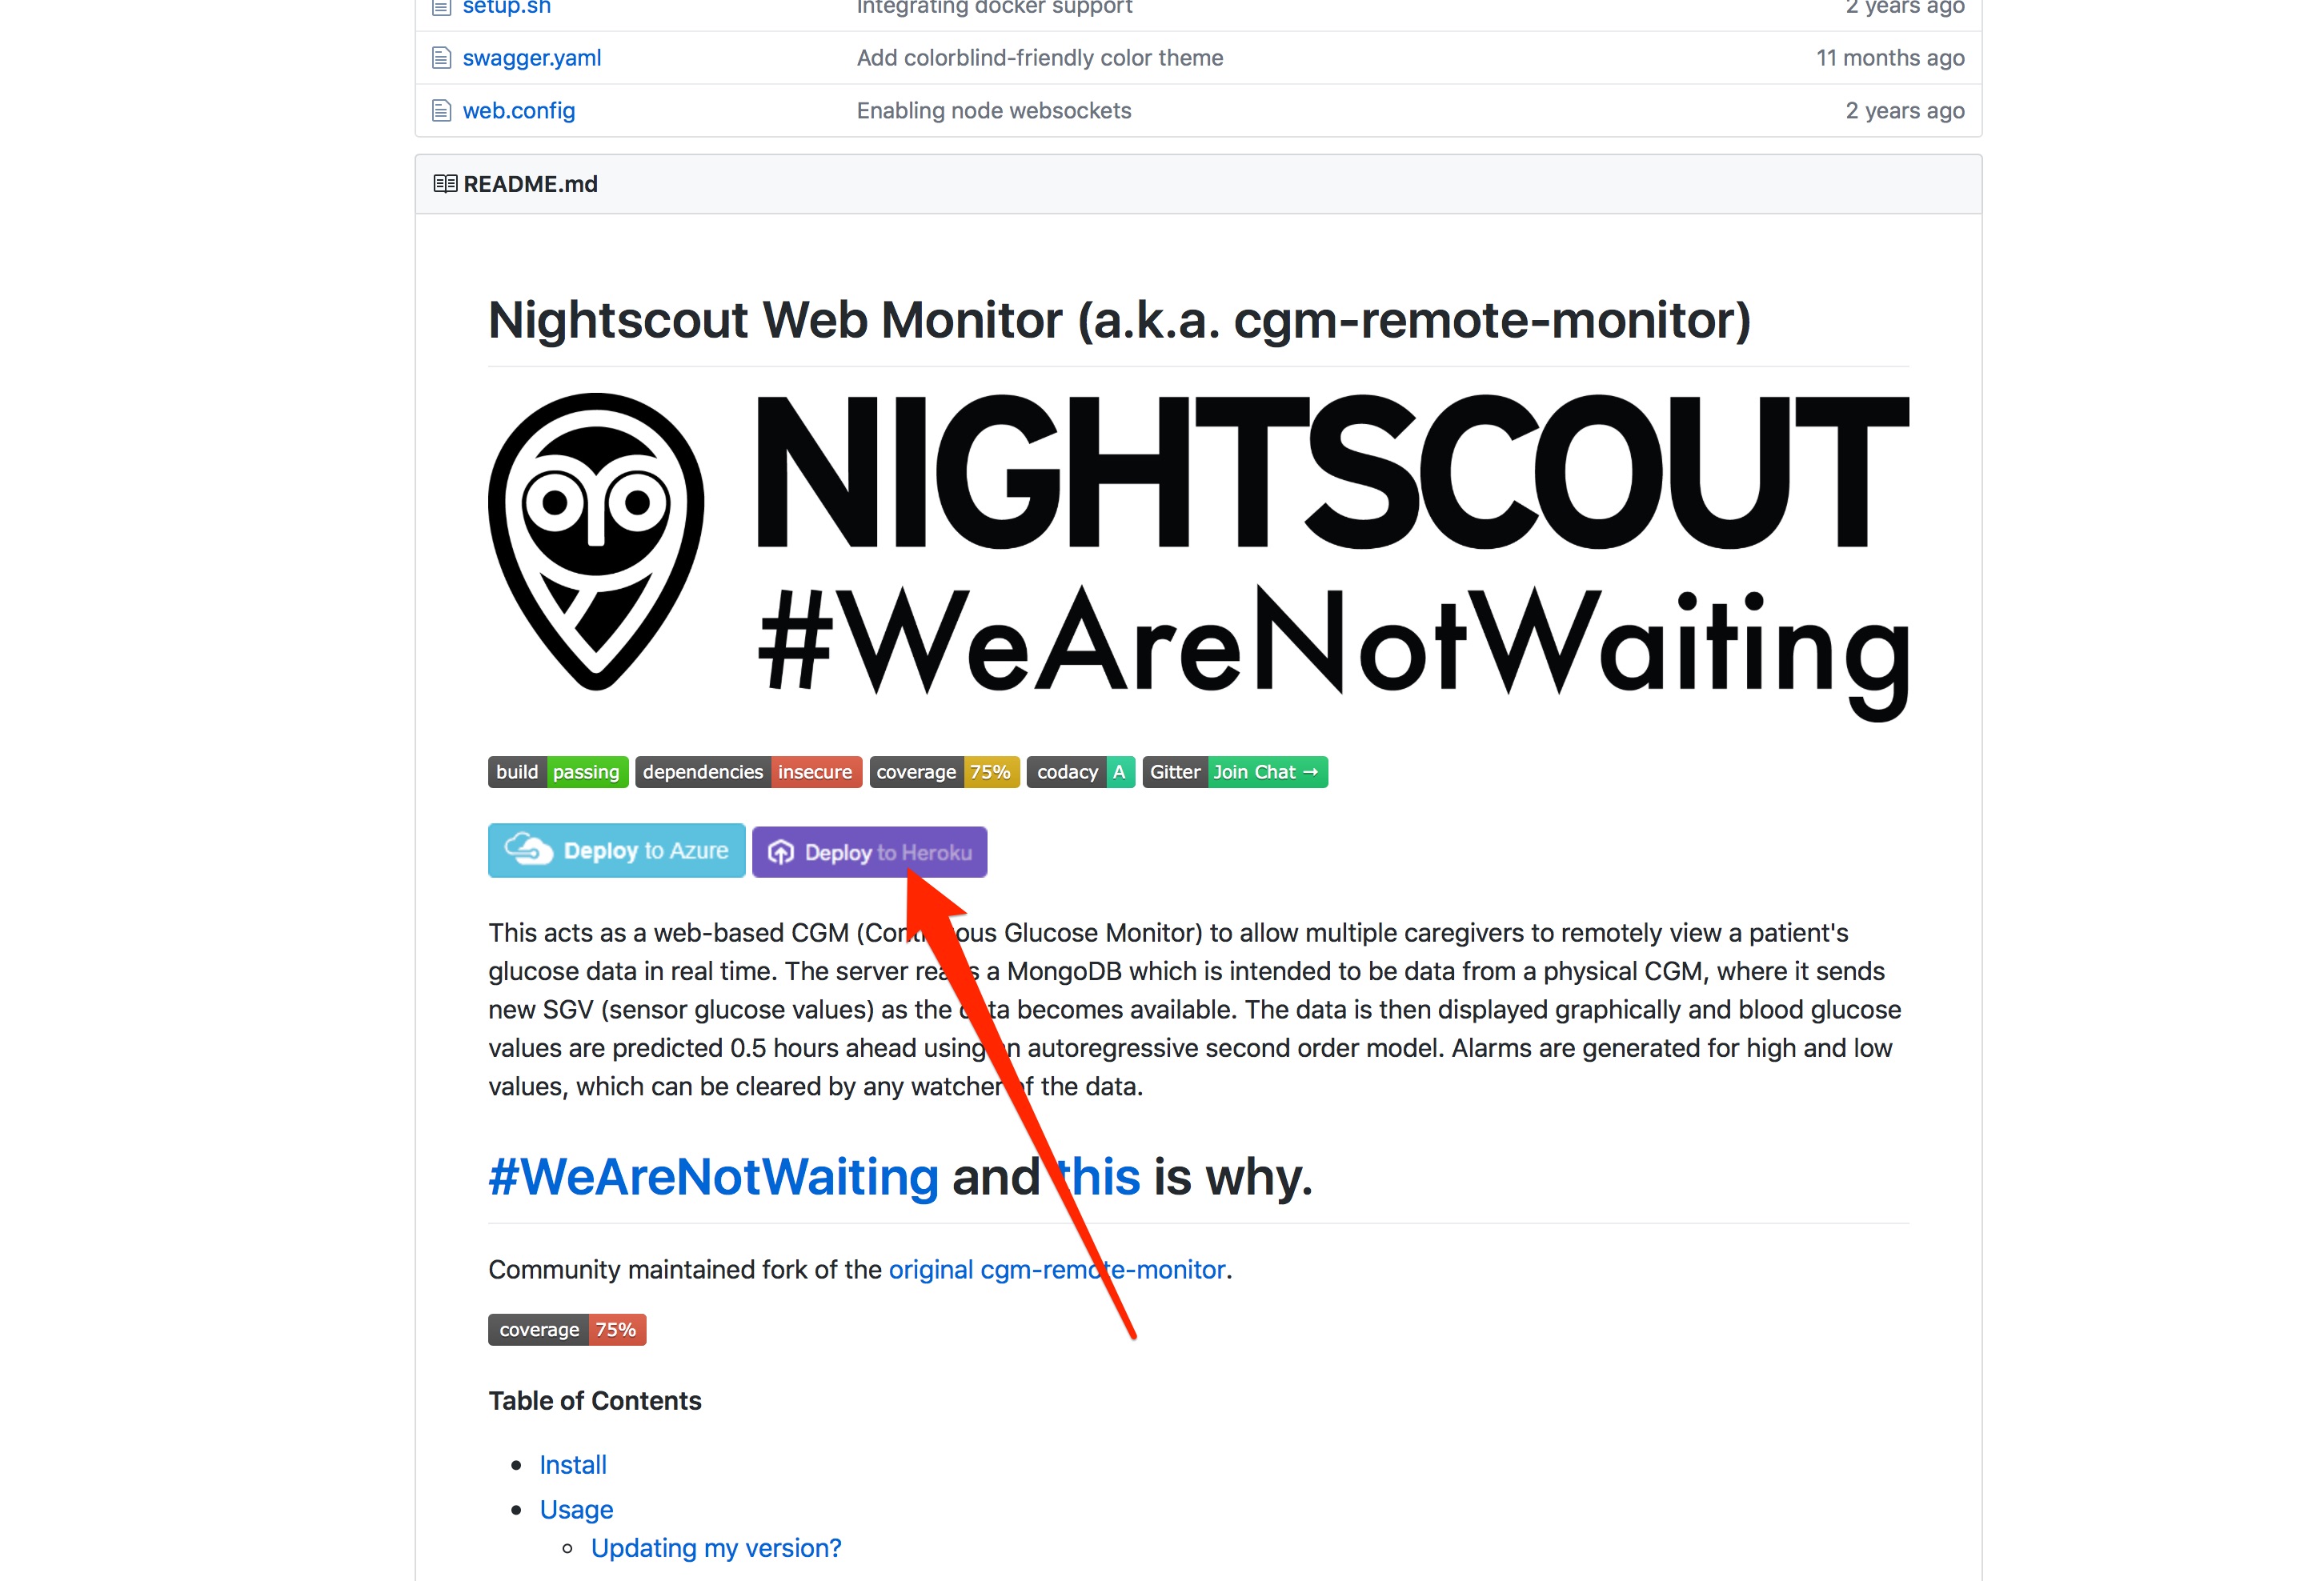
- Scroll down until you see the purple
Deploy to Herokubutton. Click that button.
- Give your app a name, this will be the prefix of your NS site’s URL. For example,
https://yourappname.herokuapp.com - Fill out the information lines in the
Config VariablesSection of that page, as shown below. Some of the lines can stay with the default entries already provided.
| KEY | VALUE |
|---|---|
| API_SECRET | Create your own API_SECRET…this is like the password to your NS site. Please write it down somewhere safe or commit it to memory, you will be using it in the future. It needs to be at least 12 characters long and should NOT use the `@` symbol. |
| DISPLAY_UNITS | enter either mg/dl or mmol |
| ENABLE | bridge openaps pump iob basal careportal sage cage maker(Enter all of the words without commas. Just a single space between each word. Make sure autocorrect does not add space between careportal. **Notice we are not including cob here.** If you have other plugins that you would like to enable, please add them here.) |
| DISABLE | Leave blank |
| ALARM_TYPES | simple |
| BG_HIGH | Enter the numeric value of BG you’d like as an urgent high alarm. |
| BG_TARGET_TOP | Enter the numeric value of the top of your target BG. |
| BG_TARGET_BOTTOM | Enter the numeric value of the bottom of your target BG. |
| BG_LOW | Enter the numeric value of the BG you’d like as an urgent low alarm. |
| PUSHOVER lines | Can be left blank for now. If you decide to use Pushover later, you can come back and add your info to these lines. |
| CUSTOM_TITLE | This will be the text displayed in the upper left part of the NS website. |
| THEME | change from default to colors |
| BRIDGE_USER_NAME | Enter your Dexcom Share Account login name. This should be the same account name used in the Share2 or G5 Mobile app. |
| BRIDGE_PASSWORD | Enter your Dexcom Share Account password. |
| BG_TARGET_TOP | Enter the numeric value of the top of your target BG. |
| BG_TARGET_BOTTOM | Enter the numeric value of the bottom of your target BG. |
The remaining variables can be left at their default values.
- Click the purple
Deploybutton at the bottom of screen.
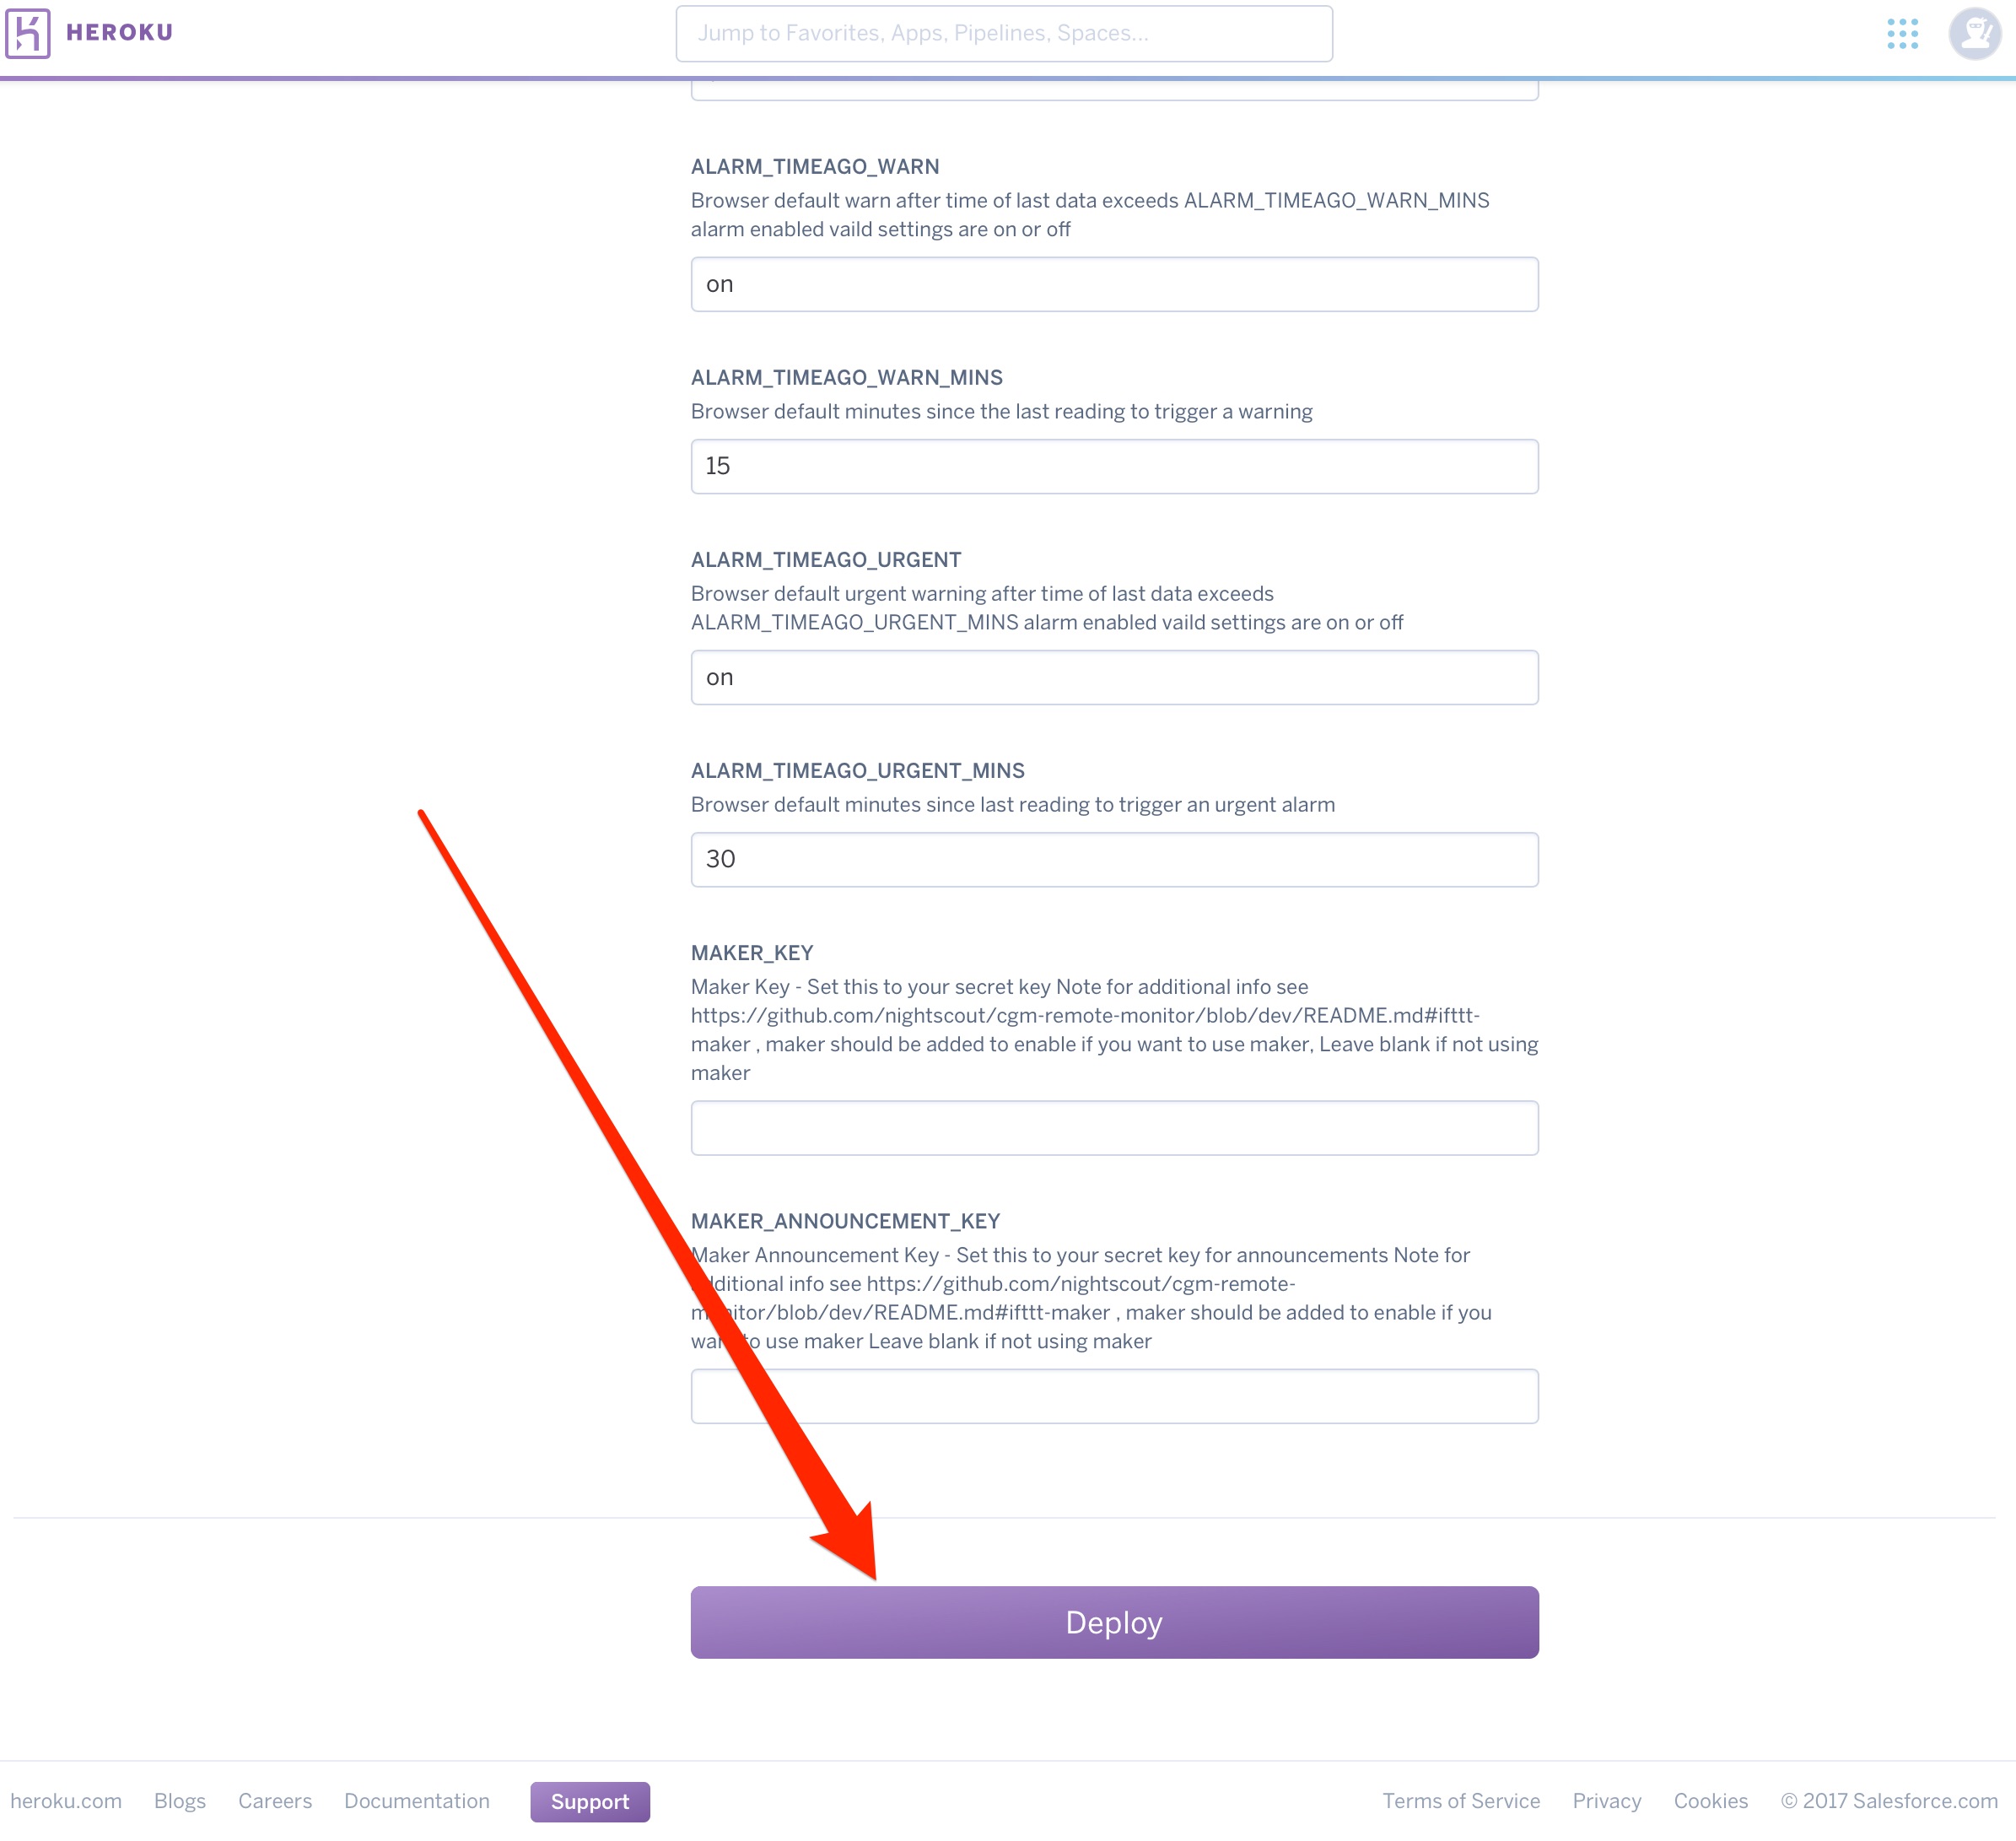
- Wait a little bit while Heroku builds your NS app. You’ll see some text scroll by in the Build App box, and then finally, you will have a message that the NS app was successfully deployed.
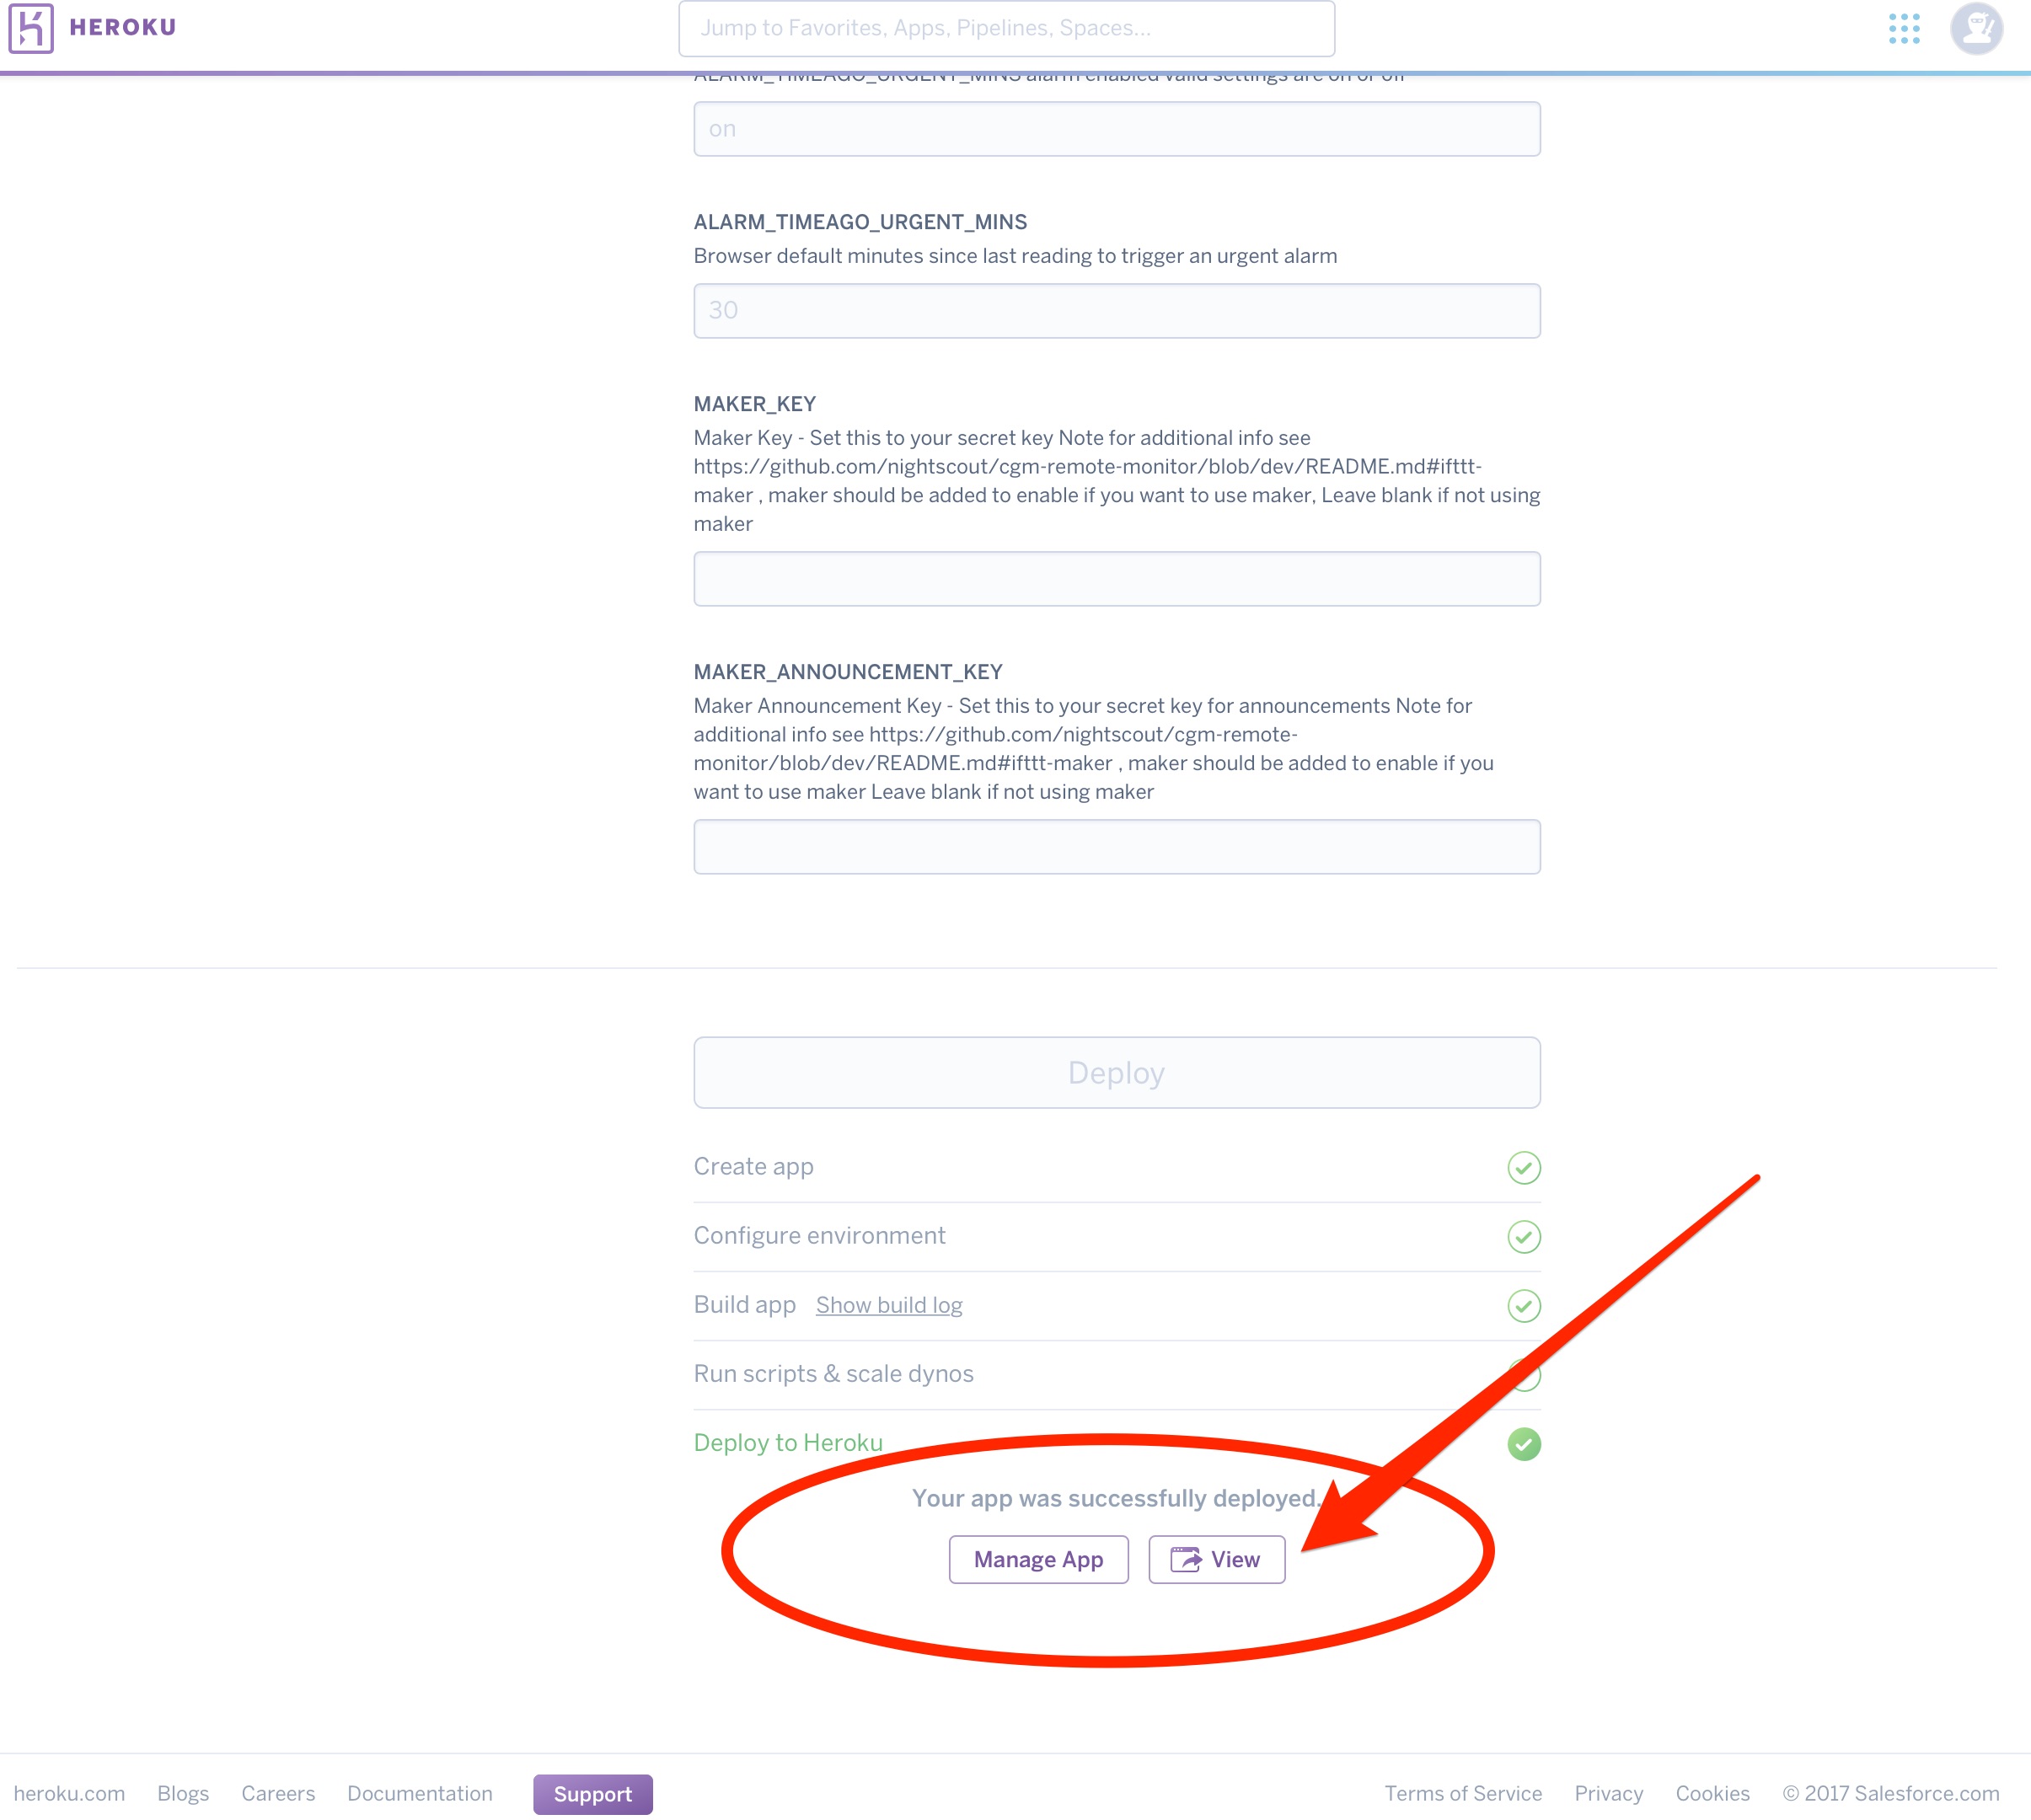
- You can verify your site’s successful build by clicking
View(you should see black site with a profile warning). You will be redirected to a profile set-up page. (If it doesn’t redirect automatically, refresh your webpage).

You do not have to enter all the information in the profile if you are using OpenAPS (since OpenAPS will be providing the information for IOB and COB rather than letting NS calculate them), but you do have to fill out the Basal Profile and TimeZone at a minimum in order to have your temp basals properly display. Click Save when you have entered the information. You will be prompted to authenticate, if it is the first time you’ve used the device to make changes in your profile. Click on the Authenticate link at the bottom of the site, and enter your API_SECRET to complete the authentication.
Note: OpenAPS will only work based on the values in your pump; not the values that you put into Nightscout profile. You will need to keep the Nightscout basal profile in-sync with any changes you make in your pump to prevent later confusion in watching the temp basal rendering.

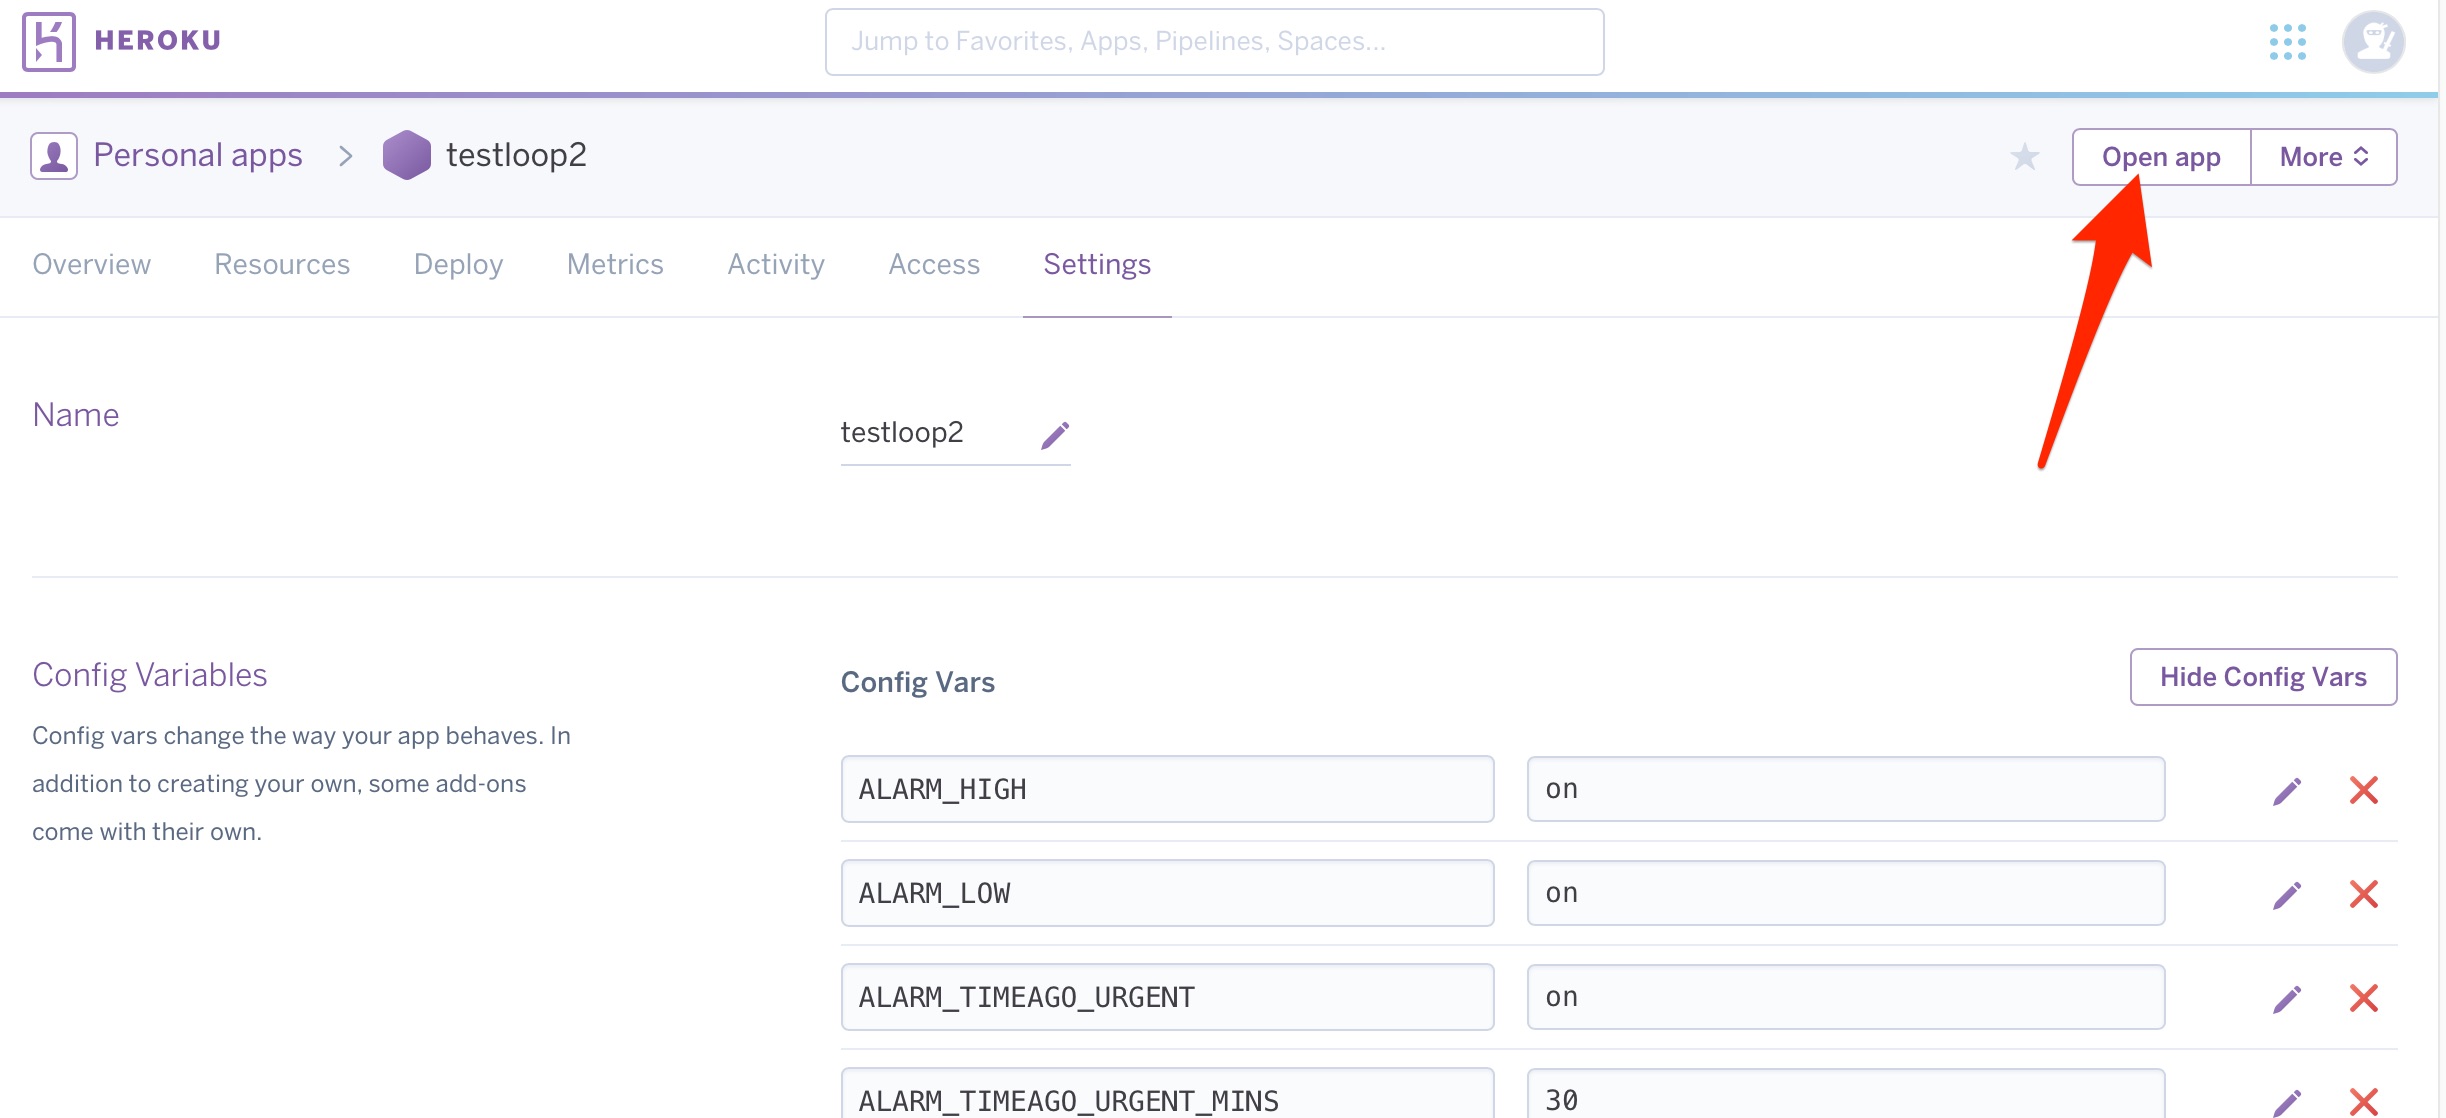
- Assuming your previous browser tab is still open for “Create a new App | Heroku”, let’s go back to that tab. This time instead of choosing the
Viewoption, we are going to select theManage Appbutton. Then, select theSettingstab near the top of the screen on your Heroku app.
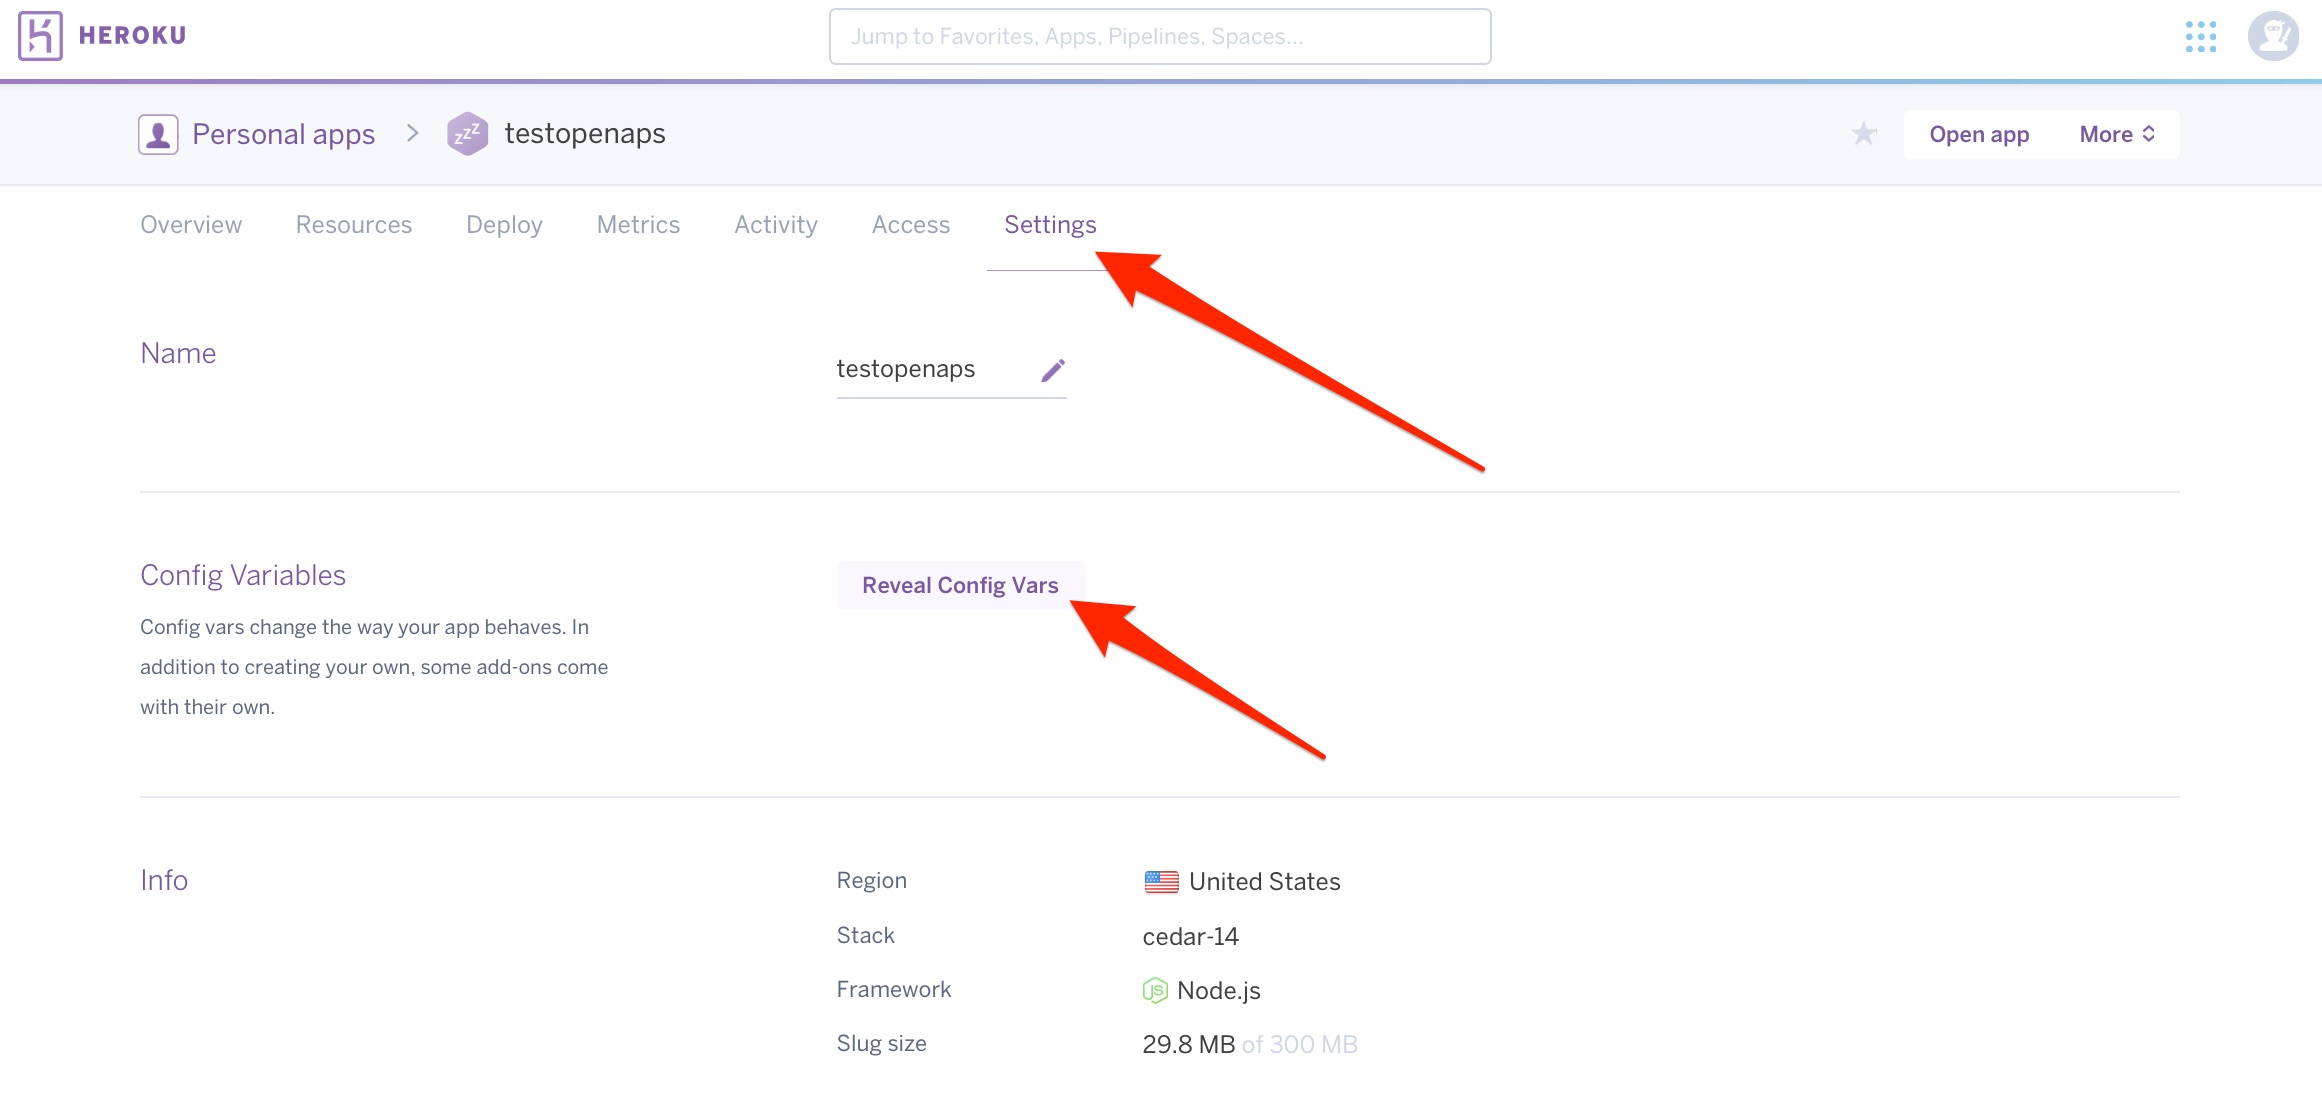
- Click on
Reveal Config Vars. Scroll down the bottom of the Config Vars lines until you find the last blank one. You are going to add several additional lines of config vars for Loop use; the DEVICESTATUS_ADVANCED is a required line, the others just make Nightscout more useful when using OpenAPS.
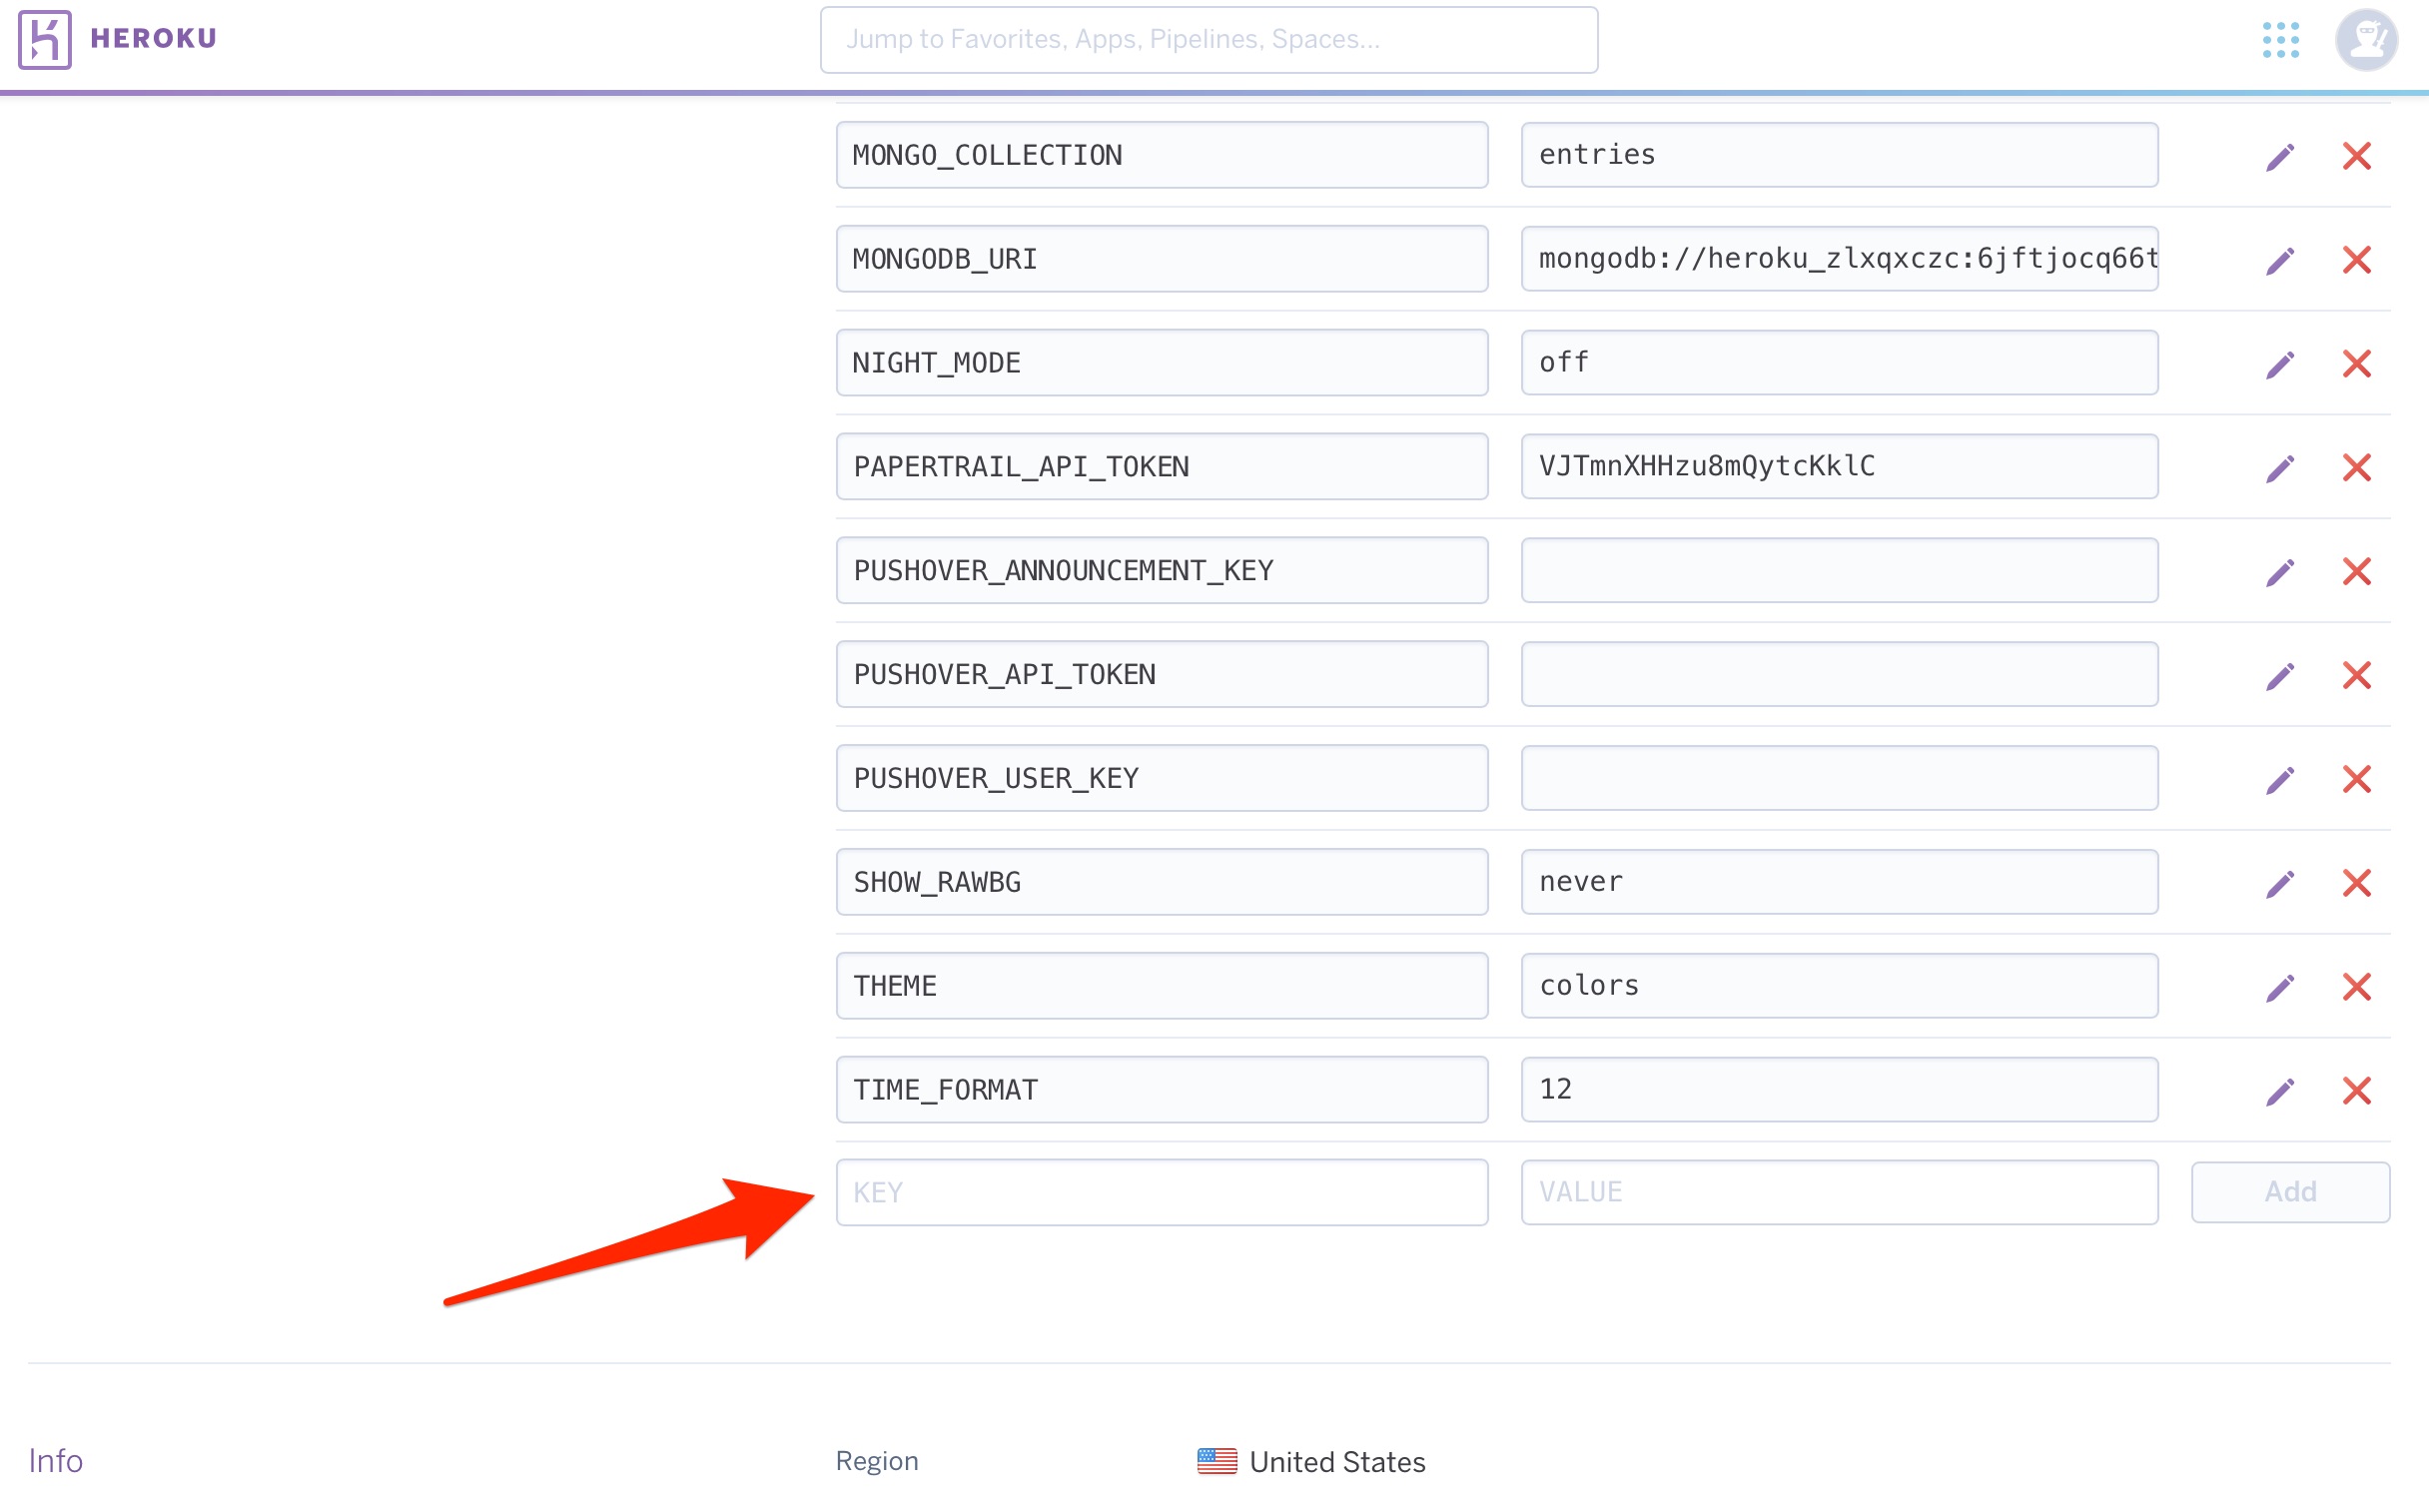
| KEY | VALUE |
|---|---|
| DEVICESTATUS_ADVANCED | true |
| PUMP_FIELDS | battery reservoir clock status |
| PUMP_RETRO_FIELDS | battery reservoir clock status |
| SHOW_FORECAST | openaps |
| SHOW_PLUGINS | openaps pump iob sage cage careportal |
| PUMP_ENABLE_ALERTS | true |
| PUMP_URGENT_BATT_V | 1.3(This is the pump battery voltage that will trigger a red, urgent alert in NS.) |
| PUMP_URGENT_RES | 10(This is the reservoir volume that will trigger a red, urgent alert in NS.) |
| PUMP_URGENT_CLOCK | 30 |
| OPENAPS_ENABLE_ALERTS | true |
| OPENAPS_FIELDS | status-symbol status-label iob meal-assist rssi |
| OPENAPS_RETRO_FIELDS | status-symbol status-label iob meal-assist rssi |
| OPENAPS_WARN | 20(This is the minutes since OpenAPS last successfully looped. This will be a yellow alert in NS.) |
| OPENAPS_URGENT | 60(Same as the alert above, but will be red in color and have a shorter snooze option.) |
- Click on
Open Appin the top right corner of your Heroku site.
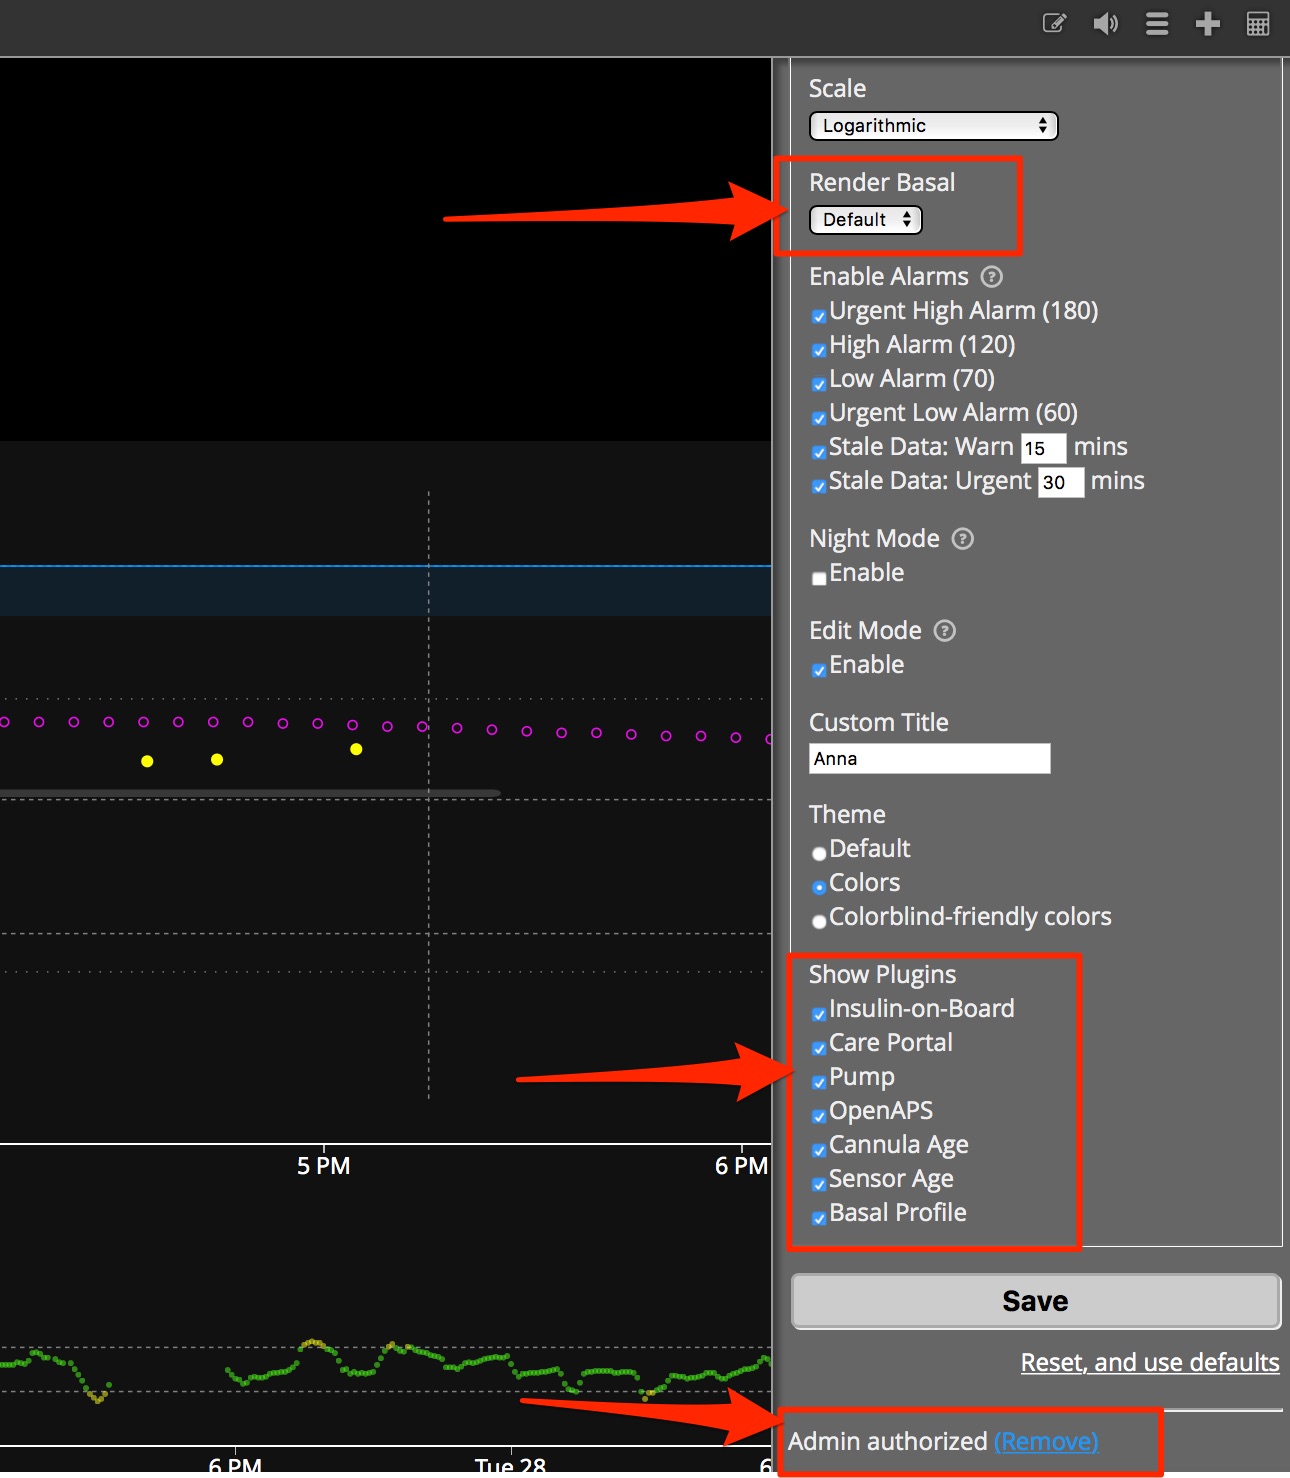
- Click on the settings (those three horizontal lines in upper right corner). Now check that your basal render is selected to either default or icicle (personal preference for how the temp basals show as blue lines in NS site), check the boxes that you’d like display pills in the SHOW PLUGINS (usually all of them), and then press save. Your NIGHTSCOUT site is all set-up. Congrats!
It’s not working - I’m missing data in Nightscout?
If you are using a “test pump” that has not received sufficient data in some time, Nightscout pills will NOT be displayed onscreen. Nightscout may also not work if it hasn’t had CGM data in a while - so if you haven’t been using a CGM and uploading CGM data to Nightscout for the past few days, the site may be empty as well. If this happens, simply use this pump in tandem with a CGM so glucose values are recorded and eventually uploaded to Nightscout. Once sufficient data has been collected, (and OpenAPS plugin is enabled and saved), the OpenAPS pills should appear automatically. Medtronic CGM users may also need to do this to get their CGM data flowing into Nightscout after a gap in uploading data.
Switching from Azure to Heroku
- If you are a current OpenAPS user and want to switch from Azure to Heroku, you will need to change your NS URL in both
ns.iniand incron. Alternatively, you can edit your runagain.sh file and run the setup script again. - If you’d like to seamlessly keep all your old Azure NS data showing in your new Heroku NS site, you’ll need to copy and paste your old
MONGODBstring from your Azure site. Find it in either Application Settings or Connection strings in your Azure control panel and then go to Heroku’sMONGODB_URIline. Replace the content with your copied string from Azure. Double check that your Azure collection used the “entries” name…if it doesn’t, then you will need to update that variable in Heroku to match as well.
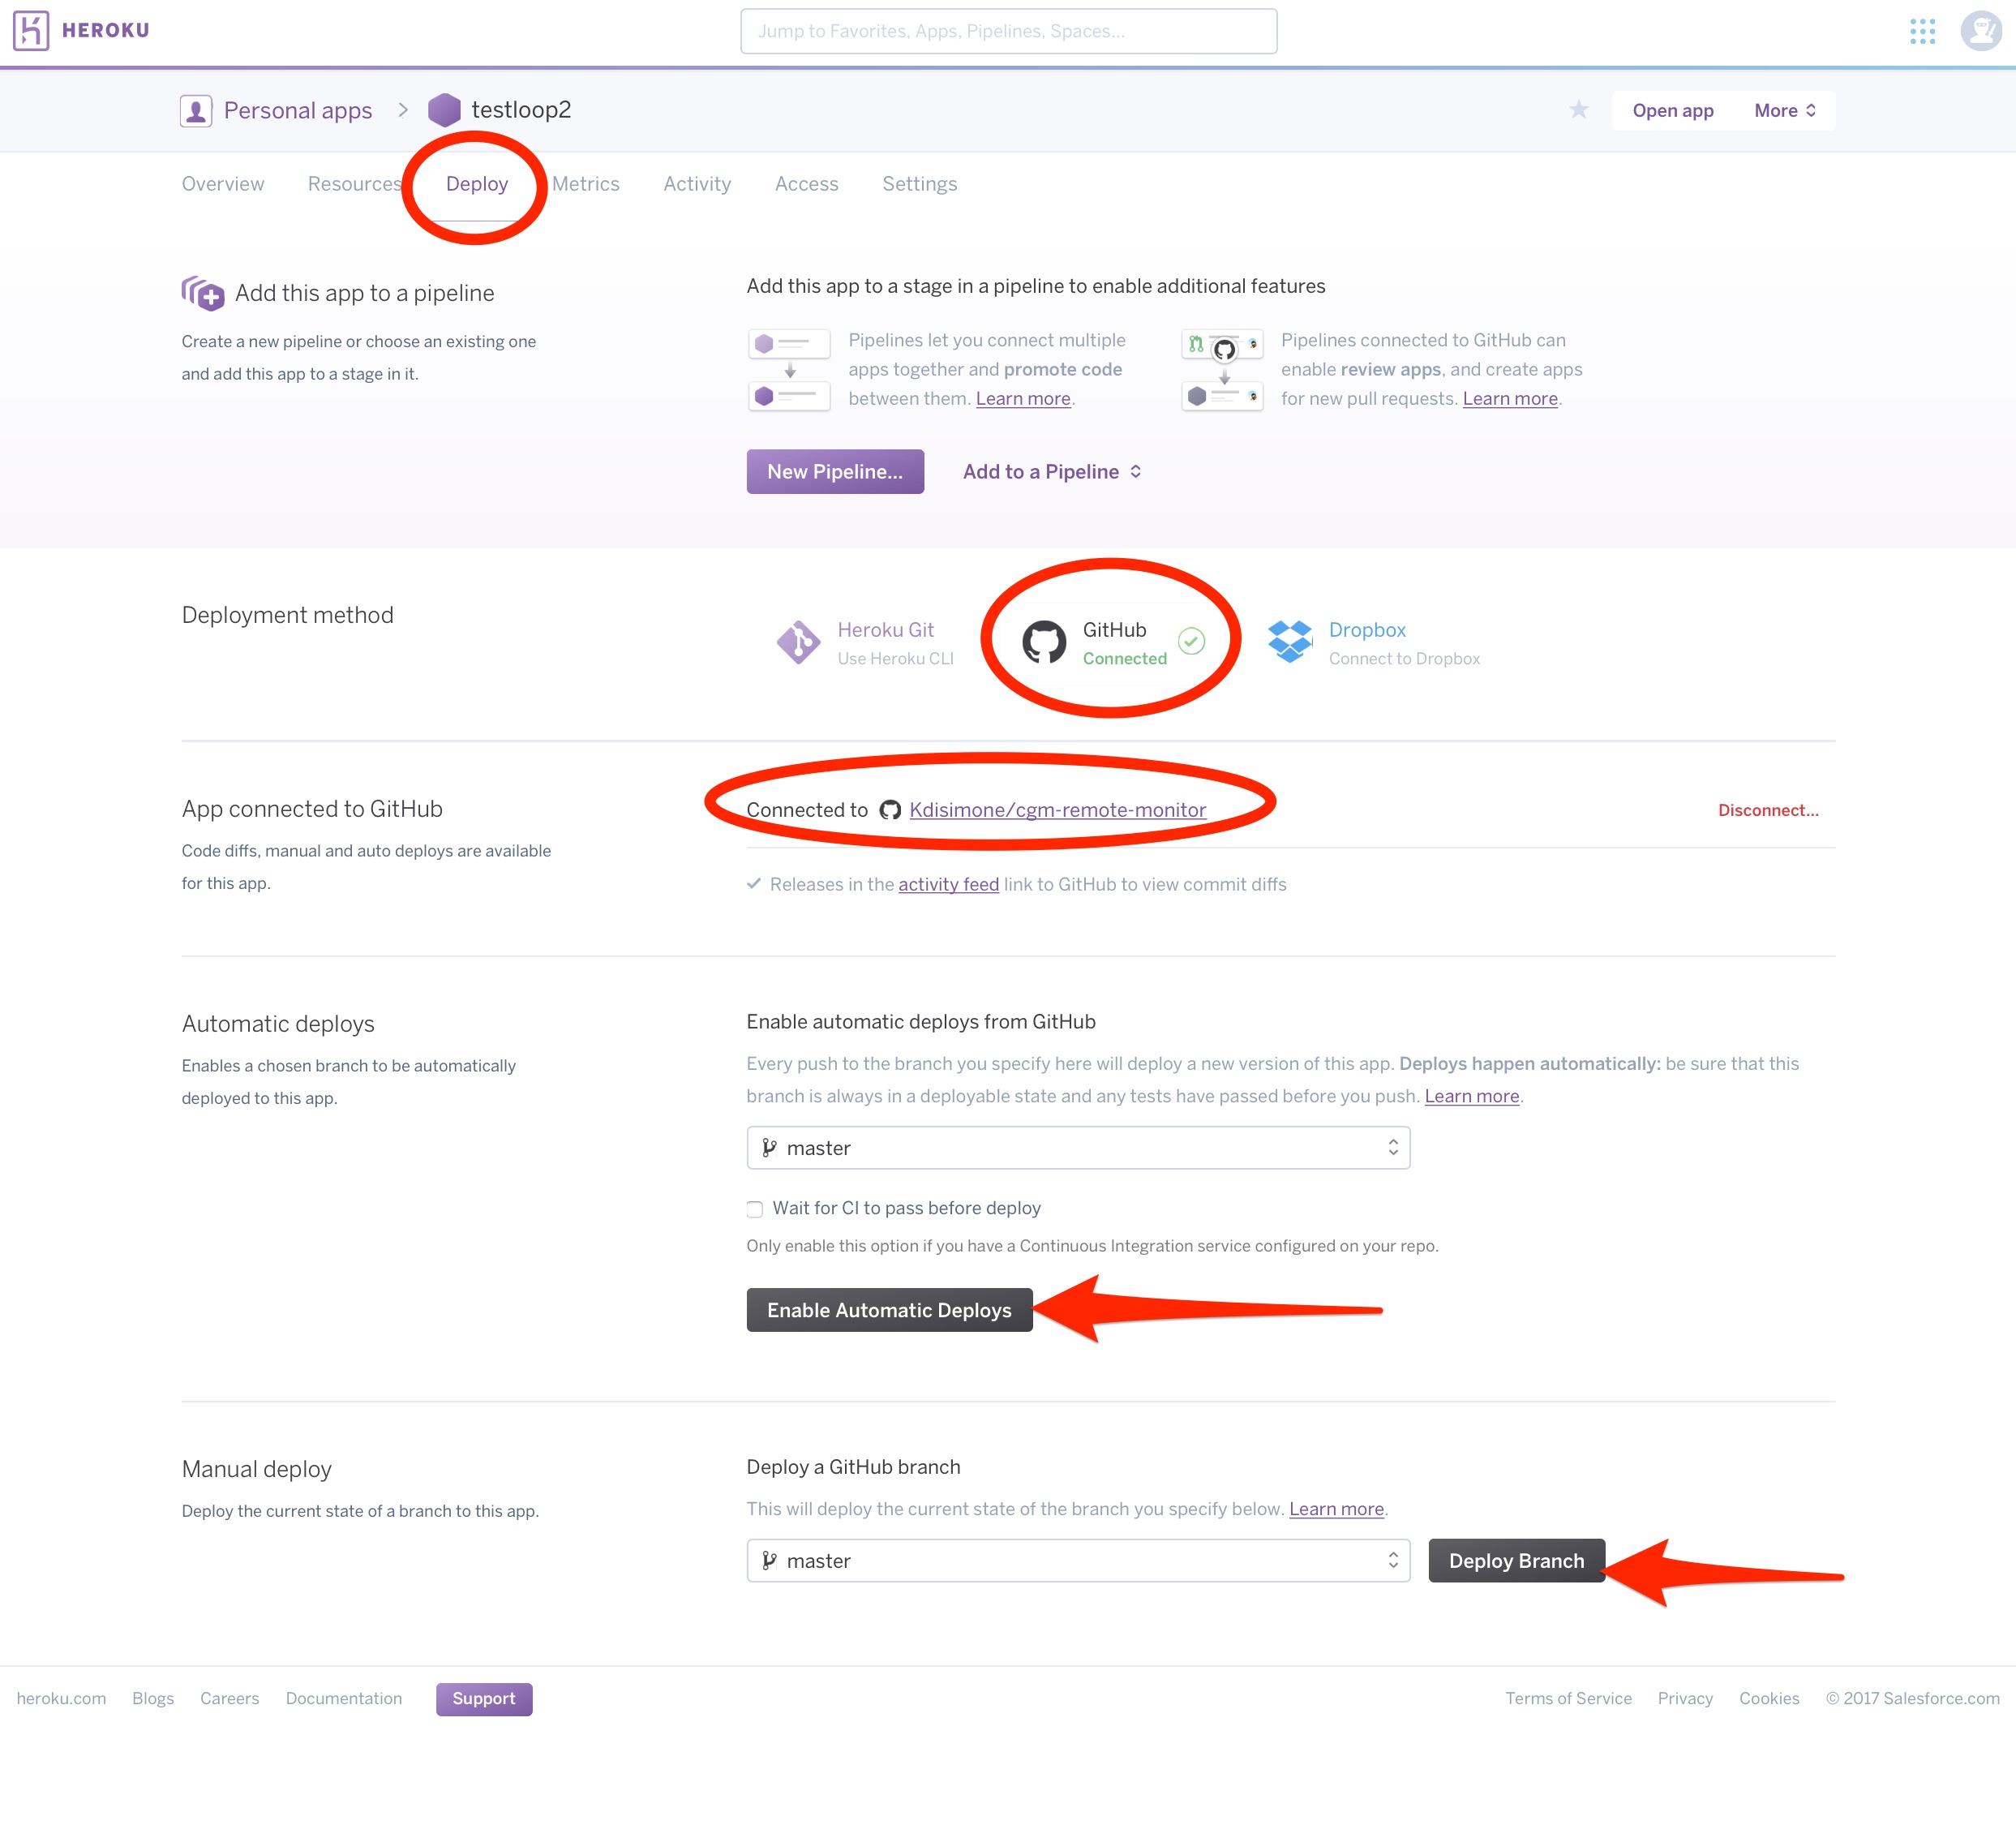
Note: It’s a good idea to to check your deployment connection in Heroku’s dashboard after your deploy (typically this still needs to be manually connected after initial setup). Go your Deploy tab in your Heroku dashboard, click on the GitHub service, and select your GitHub cgm-remote-monitor repository. You can select the cgm-remote-monitor branch you’d like to deploy at the bottom of the screen. Both master and dev branches work for OpenAPS.
A Note about Nightscout’s COB Pill
If you have the Advanced Meal Assist (AMA) OpenAPS feature turned on, OpenAPS calculates COB dynamically. To see your COB on your Nightscout web app, look inside the OpenAPS pill. (If it says “undefined”, this means you do NOT have AMA turned on.)
Nightscout, however, has its own COB pill, which decays carbs statically, and it is NOT used in OpenAPS calculations.
- We highly recommend NOT using the Nightscout COB pill. We even recommend removing it from your Nightscout ENABLE web app settings as it causes bugs, and great confusion, because it will do a static decay and/or mess up your Nightscout.
- Note also: Nightscout’s Bolus Wizard Preview (BWP) pill also decays carbs statically.
- To avoid confusion: Turn off all other Nightscout pills that use static COB calculations.
How to display basal changes (“render basal”)
- In case you missed it during setup: we recommend that you “render”/display the basal rates (the blue lines to show what temp basals have been enacted, if any.) To do so, select “Default” or “Icicle” from the “Render Basal” pull-down menu in the Settings.
How to display OpenAPS purple prediction/forecast lines
- Click the three dots next to your timeframe horizon (3HR, 6HR, 12HR, 24HR) and then enable “Show OpenAPS Forecasts”. Don’t see this option? Check and make sure you added this variable and that your OpenAPS has successfully run.
Understanding the OpenAPS pill
The OpenAPS pill box has four states, based on what happened in the last 15 minutes: Enacted, Looping, Waiting, and Warning:
- Waiting is when OpenAPS is uploading, but hasn’t seen the pump in a while
- Warning is when there hasn’t been a status upload in the last 15 minutes
- Enacted means OpenAPS has recently enacted the pump
- Looping means OpenAPS is running but has not enacted the pump
- Unknown means Error or Timeout; OpenAPS has reported a failure, or has reported no status for many hours.
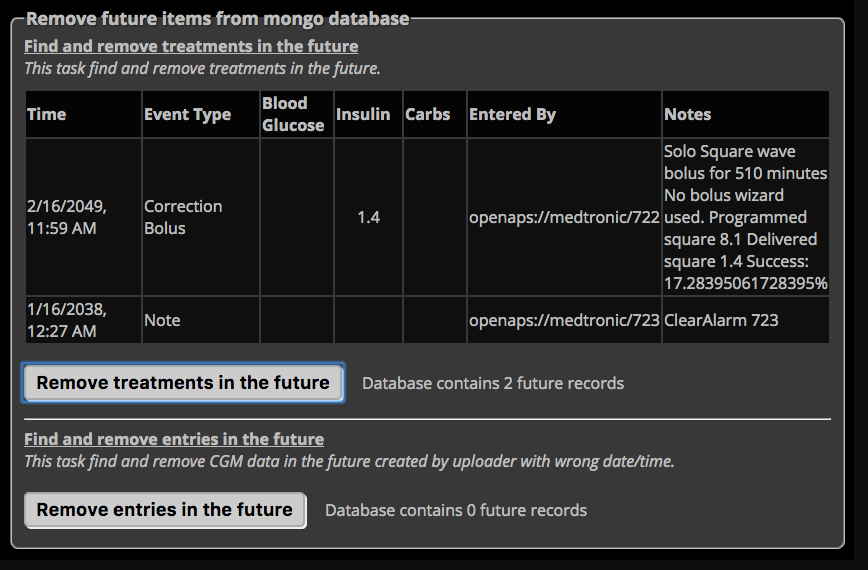
All of a sudden, Nightscout is no longer showing treatments (bolus, carbs) on the graph or rendering my basals.
If you suddenly find that Nightscout is not showing treatments (bolus, carbs, etc.) on the graph; and/or that your basals are no longer being rendered in the blue basal line; but otherwise, everything looks normal and you are looping properly:
You probably somehow got a future-dated treatment.
To resolve:
- Go into Nightscout under “Settings” and “Admin tools” and delete any future-dated treatments (press the “remove treatments in the future” button).